Introduction
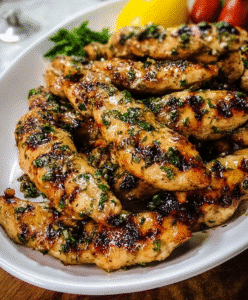
There’s something so comforting about a golden, crispy chicken dish that crackles lightly under your fork. Chicken Romano is one of those timeless recipes that feels elegant enough for a dinner party yet simple enough for a weeknight family meal. With its cheesy crust, tender chicken, and that signature Romano tang, this dish bridges Italian flair with classic home-style comfort.
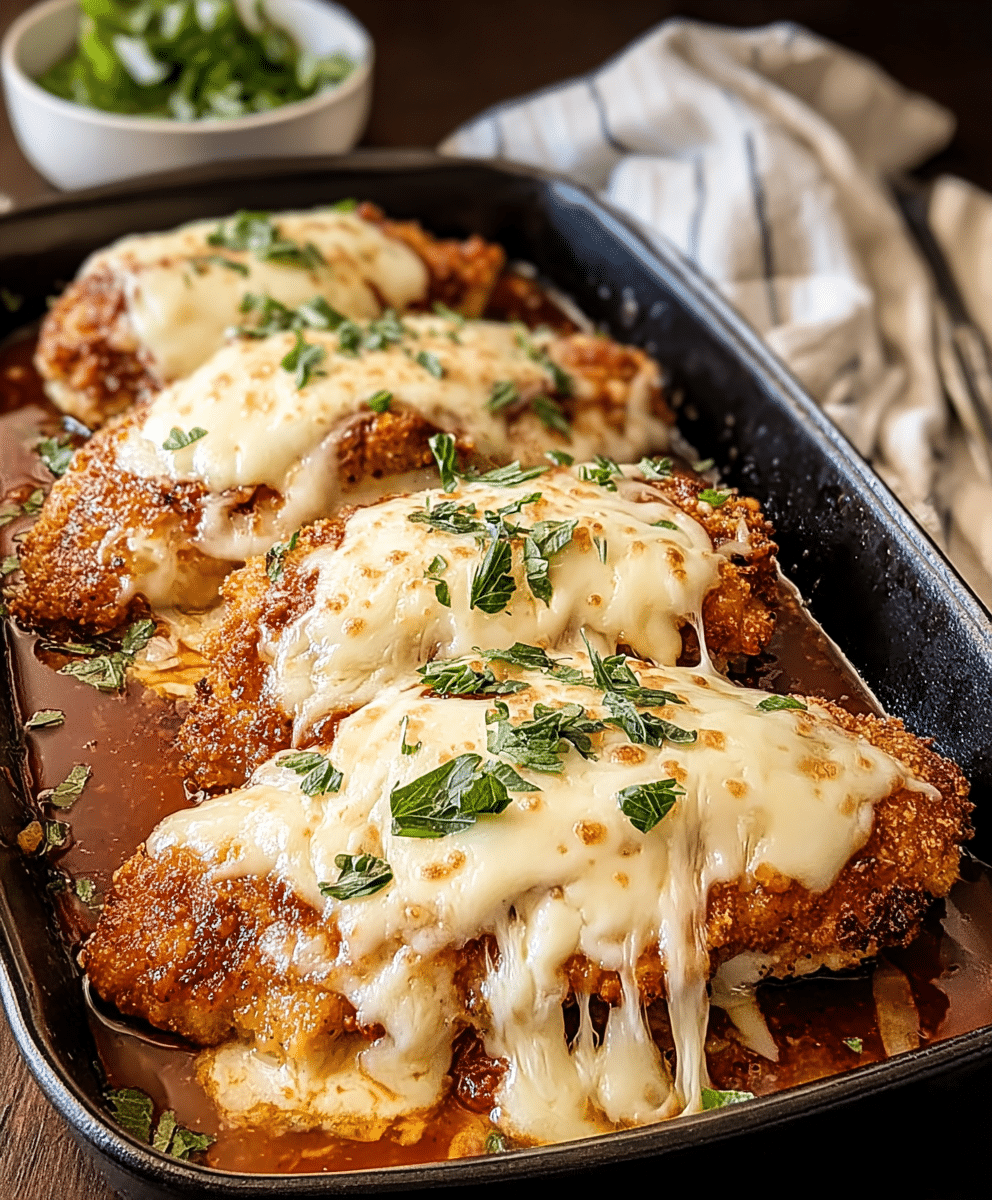
Originating from the love of Italian-American cuisine, Chicken Romano takes its name from the star ingredient—Romano cheese—a sharp, salty cheese that adds incredible depth of flavor. It’s the perfect companion to tender chicken cutlets and a crisp, golden breadcrumb coating.
This dish is everything we crave in a satisfying dinner: juicy chicken, cheesy crunch, and a whisper of garlic and paprika to round out the flavor. Whether you’re serving it with a squeeze of lemon, alongside pasta, or paired with a crisp green salad, this recipe shines every time.
It’s quick, foolproof, and family-approved—ideal for when you want something a little special without spending hours in the kitchen.
Why You’ll Love This Recipe
- Crispy yet juicy: The pan-fried crust gives a perfect crunch, while finishing in the oven keeps the chicken moist and tender.
- Cheesy and flavorful: Romano cheese infuses the coating with a nutty, tangy richness that elevates the dish.
- Quick and easy: With just 40 minutes from start to finish, this recipe fits even the busiest evenings.
- Restaurant quality at home: Impress guests with a dish that tastes gourmet but is surprisingly simple to make.
- Versatile: Pairs beautifully with pasta, roasted vegetables, or mashed potatoes.
- Make-ahead friendly: Bread the chicken earlier in the day and fry it just before serving for a stress-free dinner.
Ingredients Breakdown
Below is the complete list of ingredients you’ll need to make Chicken Romano, yielding 4 servings. Measurements are precise, ensuring consistency and the perfect balance of flavor every time.
For the Chicken:
- 4 boneless, skinless chicken breasts
- ½ cup all-purpose flour
- 2 large eggs
- ¼ cup milk
- 1 cup grated Romano cheese
- 1 cup Italian-style breadcrumbs
- ½ teaspoon salt
- ½ teaspoon black pepper
- ½ teaspoon garlic powder
- ½ teaspoon paprika
- ¼ cup olive oil (for frying)
- 2 tablespoons unsalted butter
- Fresh parsley, chopped (for garnish)
- Lemon wedges (for serving)
These simple, accessible ingredients come together beautifully, creating that irresistible golden crust and melt-in-your-mouth interior.
Tools & Equipment Needed
To make the perfect Chicken Romano, you’ll need the following kitchen essentials:
- Cutting board – for slicing and prepping the chicken.
- Sharp knife – to trim and halve chicken breasts if needed.
- Meat mallet or rolling pin – to pound chicken evenly to ½-inch thickness.
- Three shallow bowls – for the breading station (flour, egg wash, and breadcrumb mixture).
- Large skillet – preferably nonstick or stainless steel for even frying.
- Tongs – to handle chicken during frying.
- Baking sheet – for finishing the chicken in the oven.
- Paper towels – for draining excess oil after frying.
- Instant-read thermometer – optional, to check for doneness (165°F / 74°C).
- Oven – for the final bake that ensures perfectly cooked chicken.
Step-by-Step Instructions
Step 1: Prepare the Chicken
Place the chicken breasts on a clean cutting board. If they’re thick, slice each one horizontally to make thinner cutlets. This helps the chicken cook evenly and stay juicy inside without burning the crust.
Using a meat mallet, gently pound each piece to about ½-inch thickness. Uniform pieces cook at the same rate and help develop that perfect golden coating later.
Step 2: Set Up the Breading Station
Prepare three shallow bowls for a classic three-step breading process:
- Bowl 1 (Flour): Add ½ cup all-purpose flour.
- Bowl 2 (Egg Wash): Whisk together 2 large eggs and ¼ cup milk until smooth.
- Bowl 3 (Breadcrumb Mixture): Combine 1 cup grated Romano cheese, 1 cup Italian-style breadcrumbs, ½ teaspoon salt, ½ teaspoon black pepper, ½ teaspoon garlic powder, and ½ teaspoon paprika.
This layering method ensures a crisp exterior that clings beautifully to the chicken.
Step 3: Coat the Chicken
Dredge each chicken piece in the flour, coating lightly and shaking off the excess. This first layer helps the egg wash stick.
Next, dip it into the egg and milk mixture until fully coated. Finally, press the chicken firmly into the breadcrumb and Romano cheese mixture, ensuring every inch is covered. Press gently so the coating adheres well.
Set the breaded chicken aside on a clean plate. Letting it rest for a few minutes helps the coating set before frying.
Step 4: Pan-Fry the Chicken
In a large skillet, heat ¼ cup olive oil over medium heat. Once shimmering, add the chicken cutlets—be careful not to overcrowd the pan. Fry for 3–4 minutes per side, or until golden brown and crispy. The crust should be lightly browned and fragrant from the cheese and garlic powder.
If cooking in batches, add more olive oil as needed and keep the fried pieces on a paper towel-lined plate to absorb excess oil.
Step 5: Finish in the Oven
Preheat the oven to 375°F (190°C).
Transfer the browned chicken to a baking sheet. Add 2 tablespoons of butter, cut into small pieces, on top of or around the chicken. Bake for 10 minutes, allowing the butter to melt into the crust, infusing it with flavor and ensuring the chicken reaches a safe internal temperature of 165°F (74°C).
Step 6: Serve and Enjoy
Let the chicken rest for 2–3 minutes after removing from the oven. This short resting time allows juices to redistribute for tender, moist results.
Garnish with chopped fresh parsley for a pop of color and brightness. Serve each piece with a lemon wedge for squeezing over the top—a refreshing contrast to the rich Romano coating.
Tips & Variations
- Gluten-Free Option: Substitute gluten-free breadcrumbs and flour.
- Dairy-Free Adaptation: Replace Romano cheese with a dairy-free Parmesan alternative.
- Add heat: Sprinkle crushed red pepper flakes into the breadcrumb mixture for a little kick.
- Herb twist: Add a teaspoon of dried basil or oregano to the coating for extra Italian flair.
- Citrus upgrade: Zest half a lemon into the breadcrumb mixture for brightness.
- Serving idea: Slice Chicken Romano over a bed of creamy fettuccine Alfredo for a restaurant-style meal.
Flavor Profile & Pairings
Chicken Romano delivers a delightful balance of crispiness and savoriness, with a hint of nuttiness from Romano cheese and warmth from paprika and garlic. The crust is cheesy, aromatic, and crunchy, while the chicken remains juicy and tender.
Ideal Side Dishes
- Creamy mashed potatoes
- Buttered spaghetti tossed with garlic and parsley
- Roasted vegetables like asparagus or zucchini
- A crisp Caesar or Italian salad
- Garlic bread or focaccia
Each side dish complements the rich, cheesy coating without overpowering it.
Nutritional Overview
Per serving (1 chicken breast):
| Nutrient | Amount |
|---|---|
| Calories | 380 |
| Protein | 42g |
| Carbohydrates | 18g |
| Fat | 15g |
| Fiber | 1g |
| Sugar | 1g |
This recipe is high in protein, moderate in carbs, and provides a satisfying balance of energy and flavor—perfect for a wholesome meal.
Make-Ahead & Meal Prep Tips
- Bread ahead: You can bread the chicken earlier in the day and refrigerate it on a parchment-lined tray. Let it sit at room temperature for 15 minutes before frying.
- Storage: Store leftovers in an airtight container for up to 3 days in the refrigerator.
- Reheat: Reheat in a 350°F oven for 10–12 minutes to regain crispiness. Avoid microwaving to keep the crust from getting soggy.
- Freezing: Bread raw chicken, freeze on a baking sheet until solid, then store in freezer bags for up to 2 months. Fry directly from frozen, adding a few extra minutes to cooking time.
FAQs
1. Can I use Parmesan cheese instead of Romano?
Yes! Parmesan has a slightly milder flavor but works beautifully as a substitute.
2. Why finish in the oven after frying?
Oven-finishing ensures even cooking inside without over-browning the crust on the stovetop.
3. Can I make Chicken Romano with chicken thighs?
Absolutely. Boneless, skinless thighs work well and stay extra juicy—just adjust the bake time by a few minutes.
4. What’s the best oil for frying?
Olive oil adds flavor, but you can use canola or vegetable oil for a lighter taste.
5. Can I double the recipe?
Yes, easily. Just fry in batches and use two baking sheets for the oven step.
Cooking Timeline (At a Glance)
| Stage | Time |
|---|---|
| Prep | 15 minutes |
| Frying | 15 minutes |
| Baking | 10 minutes |
| Total | 40 minutes |
Serving Suggestions
Serve Chicken Romano as the star of the meal on a warm plate with a sprinkle of fresh parsley. Add lemon wedges for guests to squeeze over the top. For a full meal, include pasta with a light cream sauce, or keep it fresh with a side salad.
For a dinner party, slice the chicken into strips and arrange them over creamy risotto or garlic mashed potatoes—it looks elegant and tastes incredible.
Recipe Variations
- Chicken Romano Piccata: Add capers and a splash of white wine to the pan before baking for a tangy twist.
- Romano Chicken Tenders: Cut chicken into strips for family-friendly chicken fingers.
- Spicy Romano Chicken: Add cayenne pepper to the coating mix for bold heat.
- Cheesy Romano Sandwich: Layer sliced Chicken Romano in ciabatta bread with arugula and aioli for an upscale sandwich.
Ingredient Spotlight: Romano Cheese
Romano cheese is the heart of this recipe. Known for its sharp, salty, and slightly tangy flavor, it’s a hard Italian cheese made from cow’s or sheep’s milk.
How to Select:
Choose freshly grated Romano for the best flavor. Pre-grated versions can be convenient but may contain anti-caking agents that dull the taste.
How to Store:
Keep it tightly wrapped in parchment and a resealable bag in the refrigerator. It can last several weeks and even be frozen if tightly sealed.
How It Enhances the Dish:
Romano cheese caramelizes slightly when fried, giving the Chicken Romano that irresistible golden crust and depth of flavor that sets it apart from ordinary breaded chicken.
Pro Cooking Tips
- Pound evenly: This ensures uniform cooking and prevents dry spots.
- Don’t skip resting time: Letting breaded chicken sit before frying helps the coating adhere better.
- Use moderate heat: Too high, and the crust burns before the inside cooks.
- Butter finish: The small amount of butter added before baking enhances browning and richness.
- Drain excess oil: Place fried pieces on paper towels before baking to keep them crisp, not greasy.
Storage & Freezing Guide
- Refrigerate: Cool completely, then store in an airtight container for up to 3 days.
- Reheat: Warm in the oven at 350°F for 10–12 minutes.
- Freeze (uncooked): Freeze breaded cutlets on a tray, then store in freezer-safe bags for up to 2 months.
- Freeze (cooked): Cool, wrap individually in foil, and freeze for up to 1 month. Thaw overnight in the fridge before reheating in the oven.
Nutrition Estimate Table (Per Serving)
| Category | Amount |
|---|---|
| Calories | 380 |
| Protein | 42g |
| Carbs | 18g |
| Fat | 15g |
| Fiber | 1g |
| Sugar | 1g |
| Sodium | ~550mg |
| Cholesterol | ~130mg |
| Dietary Notes | High-Protein, Nut-Free |
Expanded Conclusion
Chicken Romano is one of those recipes that hits all the right notes—crispy, cheesy, and deeply satisfying. It brings together everyday ingredients in a way that feels both comforting and refined. The Romano cheese gives it that special Italian flair, while the quick cooking time makes it a go-to for busy weeknights.
Whether you’re making it for family dinner, meal prep, or a special date night at home, this Chicken Romano will impress every time. Serve it with a squeeze of lemon, a sprinkle of parsley, and your favorite sides for a meal that’s as beautiful as it is delicious.
If you love this recipe, be sure to share it with friends or pin it for later—you’ll want it in your weeknight rotation. Chicken Romano proves that simple ingredients, when treated with care, can create something truly unforgettable.
Print
Chicken Romano
Chicken Romano is a crispy, cheesy Italian-inspired chicken dish made with tender chicken breasts coated in Romano cheese and breadcrumbs, then pan-fried to golden perfection. It’s finished in the oven for a juicy interior and served with lemon wedges and fresh parsley for a restaurant-quality meal at home.
- Total Time: 40 minutes
- Yield: 4 servings
Ingredients
- 4 boneless, skinless chicken breasts
- ½ cup all-purpose flour
- 2 large eggs
- ¼ cup milk
- 1 cup grated Romano cheese
- 1 cup Italian-style breadcrumbs
- ½ teaspoon salt
- ½ teaspoon black pepper
- ½ teaspoon garlic powder
- ½ teaspoon paprika
- ¼ cup olive oil (for frying)
- 2 tablespoons unsalted butter
- Fresh parsley, chopped (for garnish)
- Lemon wedges (for serving)
Instructions
- Prepare the Chicken: Lay the chicken breasts on a cutting board and slice them horizontally if thick. Pound each to ½-inch thickness for even cooking.
- Set Up the Breading Station: In three shallow bowls:
- Bowl 1 – Add the flour.
- Bowl 2 – Whisk eggs and milk together.
- Bowl 3 – Combine Romano cheese, breadcrumbs, salt, pepper, garlic powder, and paprika.
- Coat the Chicken: Dredge each piece in flour, dip into the egg mixture, then coat in the Romano-breadcrumb mix, pressing gently to adhere.
- Pan-Fry: Heat olive oil in a skillet over medium heat. Cook the chicken 3–4 minutes per side until golden brown. Work in batches if needed.
- Finish in the Oven: Preheat oven to 375°F (190°C). Transfer chicken to a baking sheet and bake for 10 minutes until cooked through.
- Serve: Let rest for 2 minutes. Garnish with chopped parsley and serve with lemon wedges.
Notes
- Use freshly grated Romano for the best flavor and crispiness.
- Pair with pasta, mashed potatoes, or a simple salad for a full meal.
- Store leftovers in an airtight container for up to 3 days and reheat in the oven for best results.
- Prep Time: 15 minutes
- Cook Time: 25 minutes
- Category: Main Course, Dinner
- Method: Pan-Fried, Oven-Baked
- Cuisine: Italian-American