Creamy, colorful, and perfectly portioned, this Easy Red, White and Blue Mini Cheesecakes Recipe is a festive dessert that brings together smooth cheesecake layers, a buttery cookie crust, and fluffy whipped cream topping in adorable individual servings. The Easy Red, White and Blue Mini Cheesecakes Recipe is perfect for celebrations, summer parties, holiday gatherings, or anytime you want a fun and eye-catching dessert that tastes as good as it looks. This Easy Red, White and Blue Mini Cheesecakes Recipe combines rich cream cheese filling, sweet vanilla notes, and vibrant layered colors for a playful twist on classic cheesecake. Every bite delivers creamy texture, subtle sweetness, and a soft cookie base that makes this Easy Red, White and Blue Mini Cheesecakes Recipe a standout dessert for special occasions.
Introduction
These Red, White and Blue Mini Cheesecakes are the kind of dessert that instantly brings excitement to any table. They’re festive, creamy, and beautifully layered, making them perfect for celebrations where presentation matters just as much as flavor.
Inspired by classic cheesecake but reimagined into individual portions, this recipe transforms a traditional dessert into something more fun and approachable. Each mini cheesecake features a buttery vanilla wafer crust, a rich and smooth cheesecake filling, and colorful layers that bake into a soft, marbled effect. Finished with whipped cream and sprinkles, they feel joyful and celebratory without being complicated.
What makes these mini cheesecakes especially appealing is their balance. The filling is rich but not heavy, the crust adds sweetness and crunch, and the whipped topping adds lightness. The red and blue layers bring visual charm that makes them perfect for summer holidays, parties, or themed gatherings.
They’re also practical. Because they’re baked in cupcake liners, they’re easy to serve, store, and transport, making them a stress-free dessert option for entertaining.
Why You’ll Love This Recipe
- Perfect bite-sized individual desserts
- Festive red, white, and blue layered design
- Creamy, smooth cheesecake texture
- Easy to serve at parties and gatherings
- Make-ahead friendly for stress-free entertaining
- Classic flavor with a fun visual twist
Ingredients Breakdown
This recipe makes 12 mini cheesecakes.
Crust
- 1 cup (134g) vanilla wafer cookie crumbs
- 2 tbsp (26g) sugar
- 4 tbsp (56g) butter, melted
Cheesecake Filling
- 12 ounces (339g) cream cheese, room temperature
- 1/2 cup (104g) sugar
- 3 tbsp (24g) flour
- 1/2 cup (115g) sour cream
- 1 1/2 tsp vanilla extract
- 2 eggs
- Blue gel icing color
- Red gel icing color
Whipped Cream Topping
- 1/2 cup (120ml) heavy whipping cream, cold
- 5 tbsp (36g) powdered sugar
- 1/2 tsp vanilla extract
- Sprinkles
Vanilla wafer crumbs create a sweet, buttery base. Cream cheese forms the rich, creamy filling. Sugar adds sweetness while flour helps stabilize the texture. Sour cream adds tang and smoothness. Vanilla enhances flavor depth. Eggs provide structure. Gel coloring creates the signature festive layers. Whipped cream adds lightness, and sprinkles finish with color and texture.
Tools & Equipment Needed
- 12-cup muffin pan
- Cupcake liners
- Mixing bowls (several)
- Electric mixer (hand or stand)
- Spatula
- Measuring cups and spoons
- Small bowls for coloring batter
- Oven
- Piping bag (optional for whipped cream)
Optional tools:
- Cookie crumb processor (for crust)
- Ice cream scoop (for even batter distribution)
Step-by-Step Instructions
- Preheat and Prepare Pan
Preheat oven to 325°F (162°C). Line a cupcake pan with 12 cupcake liners. - Make the Crust
Combine 1 cup vanilla wafer crumbs, 2 tbsp sugar, and 4 tbsp melted butter. Mix until evenly coated and crumbly. - Form the Base
Divide crust mixture evenly into liners, about 2 tablespoons per cup. Press firmly into the bottom to form a compact crust. - Pre-Bake Crust
Bake for 5 minutes, then remove from oven and let cool while preparing filling. - Lower Oven Temperature
Reduce oven to 300°F (148°C). - Make Cheesecake Batter
In a large bowl, mix 12 ounces cream cheese, 1/2 cup sugar, and 3 tbsp flour until smooth and combined. Use low speed to avoid incorporating too much air. - Add Dairy and Flavor
Mix in 1/2 cup sour cream and 1 1/2 tsp vanilla extract until smooth. Scrape down the bowl as needed. - Add Eggs
Add 2 eggs one at a time, mixing slowly and scraping the bowl after each addition. - Divide Batter
Separate batter evenly into three bowls. Leave one plain (white), color one red, and color one blue using gel icing colors. - Layer the Batter
Spoon layers into each crust: start with white, then red, then blue. Repeat until cups are mostly full. - Bake Cheesecakes
Bake for 18–20 minutes until set around edges but slightly soft in the center. - Cool in Oven
Turn off oven and leave door closed for 10 minutes. - Gradual Cooling
Crack oven door open and allow cheesecakes to cool for 15–20 minutes. - Chill Completely
Transfer to refrigerator until fully cooled. - Make Whipped Cream
Whip 1/2 cup cold heavy cream, 5 tbsp powdered sugar, and 1/2 tsp vanilla extract on high speed until stiff peaks form. - Decorate
Pipe whipped cream onto cooled cheesecakes and top with sprinkles. - Chill Until Serving
Store in an airtight container in the refrigerator until ready to serve.
Tips & Variations
- Use room temperature cream cheese for smooth batter
- Mix on low speed to avoid cracks
- Use gel food coloring for vibrant layers
- Add lemon zest for a citrus twist
- Swap vanilla wafers for graham crackers if desired
- Top with berries instead of sprinkles for a fresh variation
Flavor Profile
These mini cheesecakes are rich, creamy, and lightly tangy with a smooth vanilla base. The cookie crust adds buttery sweetness and a slight crunch. Sour cream brings a subtle tang that balances the richness of the cream cheese.
The whipped cream topping adds lightness, while the colorful layers don’t change flavor significantly but enhance the overall dessert experience visually. The result is a classic cheesecake flavor with a festive, celebratory presentation.
Nutritional Overview (Per Serving – Estimated)
- Calories: 220
- Protein: 3g
- Carbs: 22g
- Fat: 14g
- Fiber: 0g
These are indulgent, portion-controlled desserts perfect for special occasions.
Make-Ahead & Storage Tips
These mini cheesecakes are ideal for preparing ahead:
- Bake up to 2 days in advance
- Store in airtight container in refrigerator
- Add whipped cream topping just before serving for best texture
Storage:
- Refrigerate for 2–3 days
- Not recommended for freezing once topped
FAQs
Can I make these ahead of time?
Yes, they are perfect for making 1–2 days ahead.
Can I skip food coloring?
Yes, they will still taste the same without color.
Why did my cheesecakes crack?
Overmixing or overbaking can cause cracks—mix gently and bake carefully.
Can I use a different crust?
Yes, graham cracker crust works well too.
Do I need a piping bag for the topping?
No, you can spoon whipped cream on top if preferred.
Cooking Timeline
| Prep Time | Cook Time | Total Time | Servings |
|---|---|---|---|
| 20 minutes | 30 minutes | 50 minutes | 12 mini cheesecakes |
Serving Suggestions
Serve these mini cheesecakes chilled on a decorative platter for maximum visual impact. Add fresh berries or extra sprinkles for a festive touch.
They work beautifully for summer holidays, birthday parties, or any celebration where individual desserts are ideal for easy serving.
Recipe Variations
- Add lemon zest for a bright citrus flavor
- Use chocolate cookie crust for a richer base
- Top with fresh strawberries or blueberries instead of sprinkles
- Swirl colors instead of layering for a marbled effect
Ingredient Spotlight: Cream Cheese
Cream cheese is the heart of this recipe, providing the signature smooth and creamy texture. For best results, always use full-fat cream cheese at room temperature to ensure a lump-free batter.
Properly softened cream cheese blends more easily, reducing air incorporation and helping prevent cracks during baking. It also contributes to the rich, tangy flavor that defines classic cheesecake.
Store cream cheese refrigerated and bring it to room temperature before mixing for the best consistency.
Pro Cooking Tips
- Don’t overmix after adding eggs
- Bake at low temperature for smooth texture
- Cool gradually to prevent sinking or cracking
- Use gel coloring for bold, clean layers
- Chill completely before decorating
Storage & Freezing Guide
- Refrigeration: 2–3 days in airtight container
- Freezing: freeze plain cheesecakes (without topping) up to 1 month
- Thaw in refrigerator overnight before serving
- Add whipped cream only after thawing
Nutrition Estimate Table (Per Serving)
| Nutrient | Amount |
|---|---|
| Calories | 220 |
| Protein | 3g |
| Carbs | 22g |
| Fat | 14g |
| Fiber | 0g |
Dietary notes: vegetarian-friendly and easily portion-controlled for celebrations.
Expanded Conclusion
These Red, White and Blue Mini Cheesecakes are the perfect combination of fun presentation and classic dessert flavor. They’re creamy, festive, and beautifully portioned, making them ideal for gatherings where you want something both impressive and easy to serve.
Whether you’re celebrating a holiday, hosting a party, or simply want a colorful dessert to share, this recipe delivers every time. It’s simple to make, easy to customize, and always a crowd favorite.
Save this recipe for your next celebration—you’ll love how quickly these mini cheesecakes disappear from the table.
Print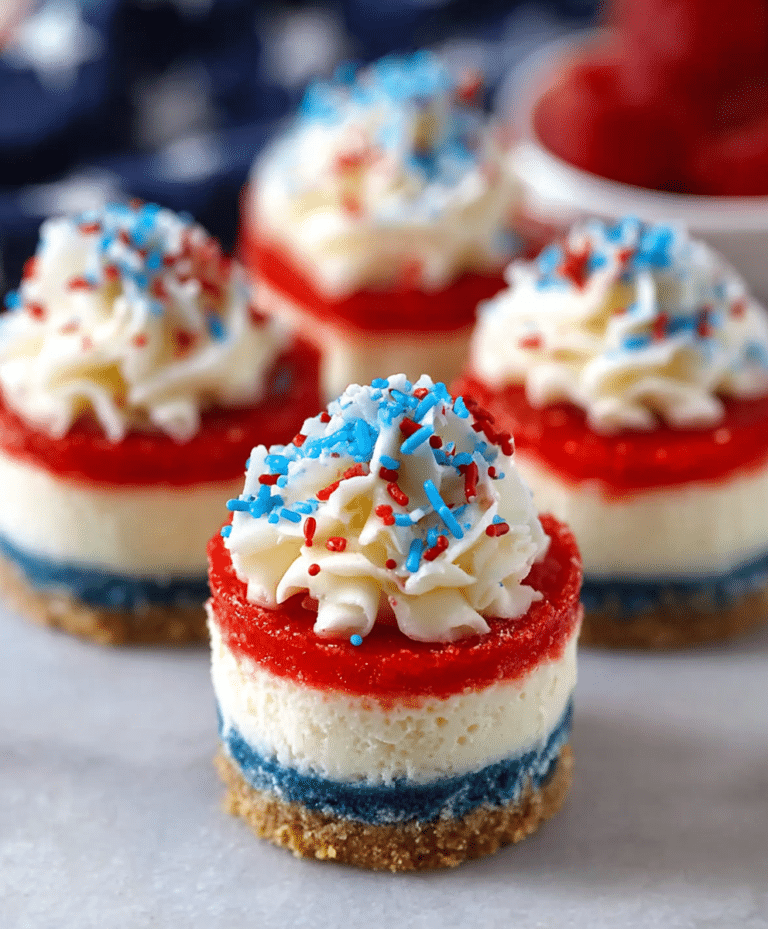
Easy Red, White and Blue Mini Cheesecakes Recipe – Festive Bite-Sized Dessert Idea
Red, White and Blue Mini Cheesecakes are festive, creamy, bite-sized desserts with a buttery vanilla wafer crust and colorful layered cheesecake filling. Finished with whipped cream and sprinkles, they’re perfect for holidays and celebrations.
- Total Time: 50 minutes
- Yield: 12 mini cheesecakes
Ingredients
- 1 cup (134g) vanilla wafer cookie crumbs
- 2 tbsp (26g) sugar
- 4 tbsp (56g) butter, melted
- 12 ounces (339g) cream cheese, room temperature
- 1/2 cup (104g) sugar
- 3 tbsp (24g) flour
- 1/2 cup (115g) sour cream
- 1 1/2 tsp vanilla extract
- 2 eggs
- Blue gel icing color
- Red gel icing color
- 1/2 cup (120ml) heavy whipping cream
- 5 tbsp (36g) powdered sugar
- 1/2 tsp vanilla extract
- Sprinkles
Instructions
- Preheat oven to 325°F and line cupcake pan with liners.
- Mix cookie crumbs, sugar, and melted butter; press into liners.
- Bake crusts for 5 minutes and cool.
- Lower oven to 300°F.
- Beat cream cheese, sugar, and flour until smooth.
- Add sour cream and vanilla, mixing gently.
- Add eggs one at a time.
- Divide batter into three bowls and color red, blue, and white.
- Layer batters into crusts.
- Bake 18–20 minutes, then rest in oven.
- Cool and refrigerate.
- Whip cream, sugar, and vanilla until stiff peaks form.
- Pipe topping and add sprinkles.
Notes
- Use room temperature cream cheese for best texture.
- Do not overmix batter to prevent cracks.
- Gel coloring gives the best vibrant layers.
- Store refrigerated for up to 3 days.
- Prep Time: 20 minutes
- Cook Time: 30 minutes
- Category: Dessert
- Method: Baking
- Cuisine: American
- Diet: Vegetarian