There’s something about the cozy scent of apples, brown sugar, and warm spices baking together that feels like a hug from the inside out. Enter the Apple Butter Pie — a luscious, custard-style dessert that combines everything you love about autumn baking into one irresistibly creamy, spiced creation.
Made with smooth apple butter, sweetened condensed milk, and a flaky homemade crust, this pie is what happens when pumpkin pie meets apple pie in the best possible way. It’s sweet, rich, silky, and carries a flavor reminiscent of baked apples, caramelized sugar, and cozy fall afternoons.
Whether you’re planning Thanksgiving dessert, a cozy weekend treat, or just looking for a way to use that jar of apple butter in the pantry, this recipe promises a slice of pure comfort.
Introduction
Imagine the creamy texture of pumpkin pie, but infused with the deep, spiced sweetness of slow-cooked apple butter. That’s the magic of Apple Butter Pie — a dessert that captures the soul of fall in every bite.
Apple butter itself is a concentrated form of apple purée, cooked down with spices until thick, glossy, and deeply flavorful. When it’s whisked into a custard with sweetened condensed milk, brown sugar, eggs, and vanilla, it transforms into a filling that’s perfectly balanced — rich yet not heavy, sweet but not cloying.
The result is a pie that feels elegant yet approachable — a dessert that fits just as easily on a Thanksgiving table as it does at a casual Sunday dinner.
If you’ve never tried baking with apple butter, this recipe will make you fall in love with its potential. It’s smooth, spiced, and gives the pie a caramelized depth that’s pure autumn magic.
Why You’ll Love This Recipe
- Creamy and Dreamy Texture: Silky smooth custard filling that rivals the best pumpkin pies.
- Fall Flavor in Every Bite: Apple butter adds depth, warmth, and subtle sweetness that pairs beautifully with cinnamon and brown sugar.
- Flaky, Buttery Crust: The homemade crust provides the perfect crisp contrast to the creamy filling.
- Make-Ahead Friendly: The pie needs to cool and set, making it ideal for preparing the day before gatherings.
- Crowd-Pleasing Presentation: Top it with cinnamon whipped cream and apple butter swirls for a bakery-quality finish.
- Customizable and Simple: Can be made with store-bought crust if you’re short on time — though the homemade version is worth the effort.
Ingredients Breakdown
Yield: 1 (9-inch) pie
Servings: 8 slices
Prep Time: 30 minutes
Cook Time: 1 hour
Rest Time: 3 hours
Total Time: 4 hours 30 minutes
Pie Crust
- 3¼ cups all-purpose flour (390g)
- 1 cup + 6 tablespoons unsalted butter, cold (311g)
- 1 teaspoon kosher salt
- ⅔ cup ice-cold water (5.3 oz)
Apple Butter Pie Filling
- 1½ cups apple butter (482g), plus a bit extra for topping
- 3 large eggs, room temperature
- ¼ cup dark brown sugar (50g)
- 1 tablespoon all-purpose flour
- 1 teaspoon vanilla paste or extract
- 1 can (14 oz) sweetened condensed milk
Cinnamon Whipped Cream
- 1 cup heavy whipping cream (240ml)
- 2 tablespoons powdered sugar (15g)
- 1 teaspoon ground cinnamon
- 1 teaspoon vanilla paste or extract
Tools & Equipment Needed
- Food processor or pastry cutter (for the crust)
- Rolling pin
- 9-inch pie plate
- Parchment paper
- Pie weights, or dried beans/rice
- Stand mixer with whisk or paddle attachment (or a handheld mixer)
- Mixing bowls
- Wire cooling rack
- Sharp knife for clean slices
Step-by-Step Instructions
Step 1: Prepare the Butter and Water
Cut the cold butter into ½-inch cubes and place them in the freezer for about 15 minutes while preparing the other ingredients.
Fill a small bowl with water and ice cubes — you’ll use this to measure ⅔ cup of ice-cold water later.
Step 2: Make the Pie Dough
In a food processor, combine flour and salt, and pulse once to distribute evenly.
Scatter the cold butter cubes over the flour and pulse until the mixture resembles pea-sized crumbs — slightly textured, not fully combined.
Measure out ⅔ cup of ice water (without ice) and drizzle it slowly through the chute while pulsing. Hold back about a tablespoon of water, adding it only if the dough looks dry.
You’ll know it’s ready when the mixture just starts to come together and easily presses between your fingers but isn’t wet.
Step 3: Chill the Dough
Divide the dough into two equal portions. Wrap each in plastic wrap, flatten into 1-inch-thick discs, and refrigerate for 1–2 hours until firm.
Note: You’ll only use one disc for this pie; the other can be frozen for future use.
Step 4: Roll Out the Crust
Let the chilled dough rest at room temperature for about 15 minutes to soften slightly.
Lightly flour your work surface and rolling pin, then roll the dough into a circle about ⅛ inch thick and 2 inches wider than your pie plate.
Rotate the dough a quarter turn every few rolls to keep it even.
Step 5: Line the Pie Dish
Carefully transfer the dough to a 9-inch pie dish, pressing it gently into the bottom and sides. Trim the overhang with kitchen shears to leave about 1 inch beyond the rim.
Fold the edges under and crimp decoratively.
Step 6: Par-Bake the Crust
Freeze the crust for 15 minutes, then dock (poke holes) all over the bottom with a fork.
Line with parchment paper and fill completely with pie weights or dried rice/beans.
Bake in a 375°F (190°C) oven for 15 minutes, then remove the weights and parchment. Continue baking for 5 more minutes until lightly golden.
Transfer to a wire rack to cool slightly while you prepare the filling.
Step 7: Prepare the Apple Butter Filling
Reduce the oven temperature to 325°F (163°C).
In a large bowl, whisk together:
- Apple butter, eggs, brown sugar, flour, and vanilla until smooth.
Then add the sweetened condensed milk, scraping every last bit from the can, and whisk until a silky custard-like batter forms.
Step 8: Fill and Bake
Pour the apple butter filling into the par-baked crust.
Place the pie on the middle oven rack and bake for 30 minutes.
Then transfer it to the lower third of the oven and bake for an additional 10–15 minutes, until the center is just set but slightly jiggly (not liquidy).
Remove the pie and cool completely on a wire rack — about 3 hours at room temperature or faster in the refrigerator.
Step 9: Make the Cinnamon Whipped Cream
In a stand mixer with the whisk attachment, combine:
- Heavy cream, powdered sugar, cinnamon, and vanilla.
Whip on high speed for 1–2 minutes until soft-stiff peaks form.
Step 10: Assemble and Serve
Spread the cinnamon whipped cream over the cooled pie, leaving rustic swoops or smooth edges as desired.
For a beautiful finish, dollop a few spoonfuls of extra apple butter on top and gently swirl it into the cream.
Slice with a sharp knife, wiping it clean between cuts for picture-perfect slices.
Serve at room temperature or slightly chilled — both ways are heavenly.
Tips & Variations
- Temperature Matters: Room temperature eggs and apple butter make the filling smoother.
- Prevent Soggy Bottoms: Always par-bake the crust and move the pie to the lower rack during the final bake.
- Extra Apple Butter: Spread a thin layer over the cooled pie before adding whipped cream for extra shine and flavor.
- Crust Edges Browning Too Fast? Use a pie shield or tent with foil.
- Golden Finish: Brush crust with an egg wash before baking for a beautifully golden edge.
- Short on Time? Substitute store-bought crust — the filling remains show-stopping.
- Dairy-Free Option: Use a non-dairy condensed milk alternative and coconut whipped cream.
Flavor Profile & Pairings
This pie is best described as creamy, spiced, and deeply comforting. The apple butter gives it a slow-cooked richness, while the brown sugar and vanilla bring to mind caramel and toffee.
The texture is smooth and custard-like, nestled in a buttery, flaky crust — the kind of dessert that melts on your tongue and lingers in the best way.
Perfect for pairing with:
- A scoop of vanilla ice cream or salted caramel gelato
- Hot coffee or chai latte for cozy afternoons
- Fresh apple slices for a crisp contrast
Nutritional Overview (Per Serving)
- Calories: 703 kcal
- Carbohydrates: 99g
- Protein: 13g
- Fat: 29g
- Saturated Fat: 18g
- Fiber: 2g
- Sugar: 55g
- Sodium: 492mg
(Note: Nutritional values are estimates. Includes two pie crusts though only one is used in this recipe.)
Make-Ahead & Storage Tips
- Make-Ahead: The pie can be baked up to 24 hours ahead and stored lightly covered at room temperature.
- Refrigerate: Keeps up to 5 days covered in the fridge.
- Serve Cold or Room Temp: Both work beautifully.
- Whipped Cream: Best used within 2 days; after that, it may begin to weep. Serve it on the side if storing long-term.
- Freezing: The baked pie (without whipped cream) can be frozen for up to 3 months. Thaw in the fridge overnight before serving.
FAQs
Q1: Can I use store-bought pie crust?
Yes! While homemade gives a flaky texture, store-bought crusts work wonderfully and save time.
Q2: What’s the difference between apple butter and applesauce?
Apple butter is thicker, darker, and more concentrated. It’s cooked longer to develop caramelized flavor — essential for this recipe’s richness.
Q3: Can I use homemade apple butter?
Absolutely. Homemade apple butter adds incredible depth and allows you to control sweetness and spice.
Q4: How do I know when the pie is done?
The center should be set but still slightly jiggly when shaken — it will firm up as it cools.
Q5: Why par-bake the crust?
This prevents soggy bottoms and keeps the crust crisp and golden.
Q6: Can I skip the whipped cream?
You can, but the cinnamon whipped cream adds balance and a creamy contrast that elevates the pie.
Cooking Timeline (At a Glance)
| Step | Task | Time |
|---|---|---|
| Prep & chill pie dough | 1 hr 30 mins | |
| Roll, shape & par-bake crust | 25 mins | |
| Prepare filling | 10 mins | |
| Bake pie | 45 mins | |
| Cooling & setting | 3 hrs | |
| Whipped cream & garnish | 10 mins | |
| Total Time | ≈ 4 hrs 30 mins |
Serving Suggestions
For a presentation that turns heads:
- Serve with a swirl of apple butter on top of the whipped cream.
- Dust lightly with ground cinnamon or nutmeg.
- Use a fluted pie dish for elegant edges.
- Plate slices with a drizzle of warm caramel sauce for extra indulgence.
Recipe Variations
- Maple Apple Butter Pie: Replace brown sugar with maple syrup for a deep, woodsy sweetness.
- Gingerbread Apple Butter Pie: Add a touch of ground ginger and molasses to the filling for festive spice.
- Pecan Apple Butter Pie: Sprinkle chopped pecans over the whipped cream for a crunchy topping.
- Salted Caramel Apple Butter Pie: Drizzle salted caramel over each slice just before serving.
Ingredient Spotlight: Apple Butter
Apple butter is what gives this pie its soul. Made by slow-cooking apples with sugar, cinnamon, and cloves until the mixture caramelizes, it’s thick, velvety, and full of natural sweetness.
How to Choose: Look for apple butter with minimal added sugar and natural spices.
Storage: Store unopened jars in the pantry and opened ones in the fridge for up to 2 weeks.
Homemade Tip: Make your own by simmering apples, brown sugar, cinnamon, and apple cider until thick and spreadable — a beautiful weekend project.
Pro Cooking Tips
- Cold Butter, Cold Hands: Keep butter and water ice-cold for the flakiest crust.
- Even Rolling: Rotate dough every few rolls for a perfect circle.
- Don’t Overmix the Filling: Whisk gently until smooth to avoid air bubbles.
- Bake Low and Slow: Prevents cracks and ensures even custard setting.
- Cool Completely: The pie continues to set as it cools — patience pays off.
Storage & Freezing Guide
- Room Temperature: Covered loosely, up to 2–3 days.
- Refrigerator: Up to 5 days for the pie; whipped cream should be added fresh.
- Freezer: Freeze baked pie (without whipped cream) for up to 3 months. Thaw overnight in the fridge before serving.
- Avoid Freezing: Whipped cream topping — add it only when serving.
Nutrition Estimate Table (Per Serving)
| Nutrient | Amount |
|---|---|
| Calories | 703 kcal |
| Protein | 13g |
| Carbohydrates | 99g |
| Total Fat | 29g |
| Saturated Fat | 18g |
| Sugar | 55g |
| Sodium | 492mg |
| Fiber | 2g |
| Cholesterol | 151mg |
| Dietary Notes | Vegetarian, nut-free |
Expanded Conclusion
Apple Butter Pie is the kind of dessert that makes everyone at the table pause after the first bite. It’s a perfect marriage of classic pie comfort and autumn nostalgia — creamy custard meets baked apple sweetness, all cradled in a flaky, buttery crust.
It’s a dessert that looks stunning yet feels familiar, making it an instant favorite for family gatherings, potlucks, and holidays. Serve it chilled with cinnamon whipped cream and a swirl of apple butter, and you’ll have a showstopping pie that wins hearts and requests for seconds.
So the next time you crave something cozy, skip the pumpkin and reach for the apple butter. This pie proves that sometimes, the simplest ingredients create the most unforgettable desserts.
Print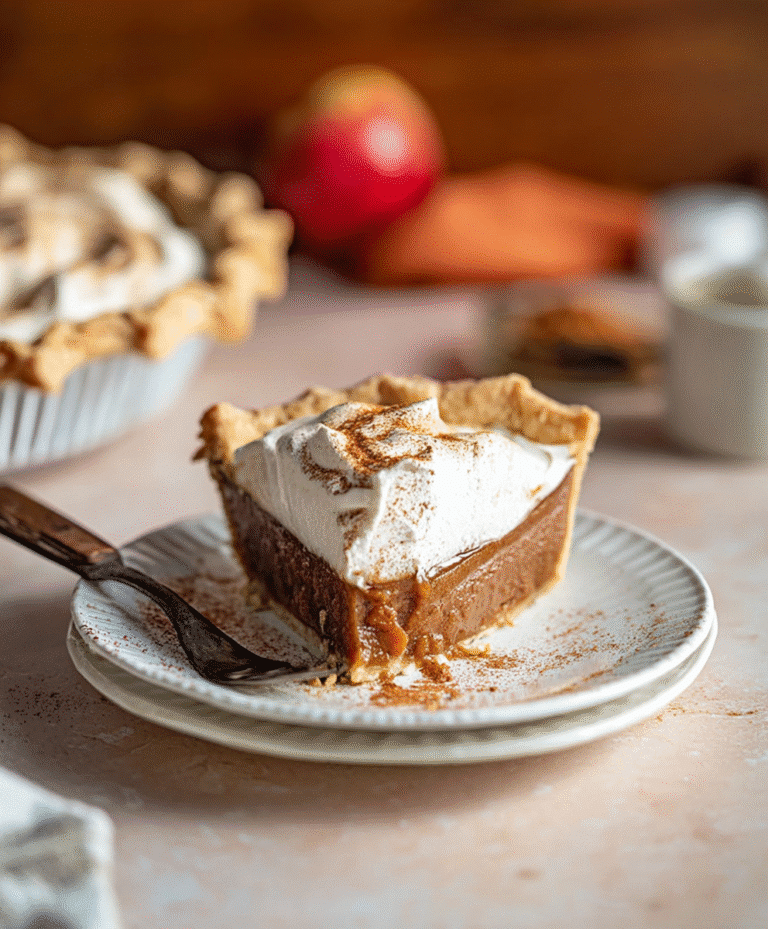
Apple Butter Pie
Apple Butter Pie is a creamy custard pie made with rich apple butter and sweetened condensed milk, all baked in a buttery, flaky crust. It has the smooth texture of pumpkin pie with the deep, spiced flavor of caramelized apples — a perfect autumn dessert that’s comforting, nostalgic, and irresistibly delicious.
- Total Time: 4 hours 30 minutes
- Yield: 8 servings
Ingredients
Pie Crust
- 3¼ cups all-purpose flour (390g)
- 1 cup + 6 tablespoons unsalted butter, cold (311g)
- 1 teaspoon kosher salt
- ⅔ cup ice-cold water (5.3oz)
Apple Butter Pie Filling
- 1½ cups apple butter (482g), plus extra for topping
- 3 large eggs, room temperature
- ¼ cup dark brown sugar (50g)
- 1 tablespoon all-purpose flour
- 1 teaspoon vanilla paste or extract
- 1 can (14 oz) sweetened condensed milk
Cinnamon Whipped Cream
- 1 cup heavy whipping cream (240ml)
- 2 tablespoons powdered sugar (15g)
- 1 teaspoon ground cinnamon
- 1 teaspoon vanilla paste or extract
Instructions
- Prepare the Pie Crust: Cut cold butter into ½-inch cubes and freeze for 15 minutes. In a food processor, combine flour and salt, then pulse in butter until pea-sized crumbs form. Slowly add ice-cold water until dough holds together when pressed. Divide into two discs, wrap, and chill for 1–2 hours (use one for this pie).
- Roll out dough on a floured surface to ⅛” thick, about 2 inches wider than your 9-inch pie dish. Fit into dish, trim edges, and crimp. Freeze 15 minutes, dock with a fork, line with parchment, and fill with pie weights.
- Bake at 375°F (190°C) for 15 minutes, remove weights, and bake another 5 minutes. Cool slightly.
- Make the Filling: Reduce oven to 325°F (163°C). Whisk together apple butter, eggs, brown sugar, flour, and vanilla. Add condensed milk and whisk until smooth.
- Pour into par-baked crust. Bake on center rack for 30 minutes, then move to lower third and bake another 10–15 minutes until set but slightly jiggly in the center.
- Cool completely on a wire rack for 3 hours (or refrigerate to speed up cooling).
- Whipped Cream: Beat cream, powdered sugar, cinnamon, and vanilla until soft-stiff peaks form. Spread over cooled pie, then swirl in extra apple butter if desired.
- Slice with a clean knife for neat servings and enjoy!
Notes
- Store lightly covered at room temperature for up to 2–3 days or refrigerated up to 5 days.
- The whipped cream may start to weep after 2 days — serve it on the side if storing long-term.
- Use pie weights, dry beans, or rice to par-bake the crust (do not eat afterward).
- Brush crust with egg wash for a golden finish. Tent with foil if edges brown too quickly.
- Reserve 2 tablespoons of apple butter for swirling into the whipped cream or spreading on top.
- Prep Time: 30 minutes
- Cook Time: 1 hour
- Category: Dessert
- Method: Baked
- Cuisine: American
- Diet: Vegetarian