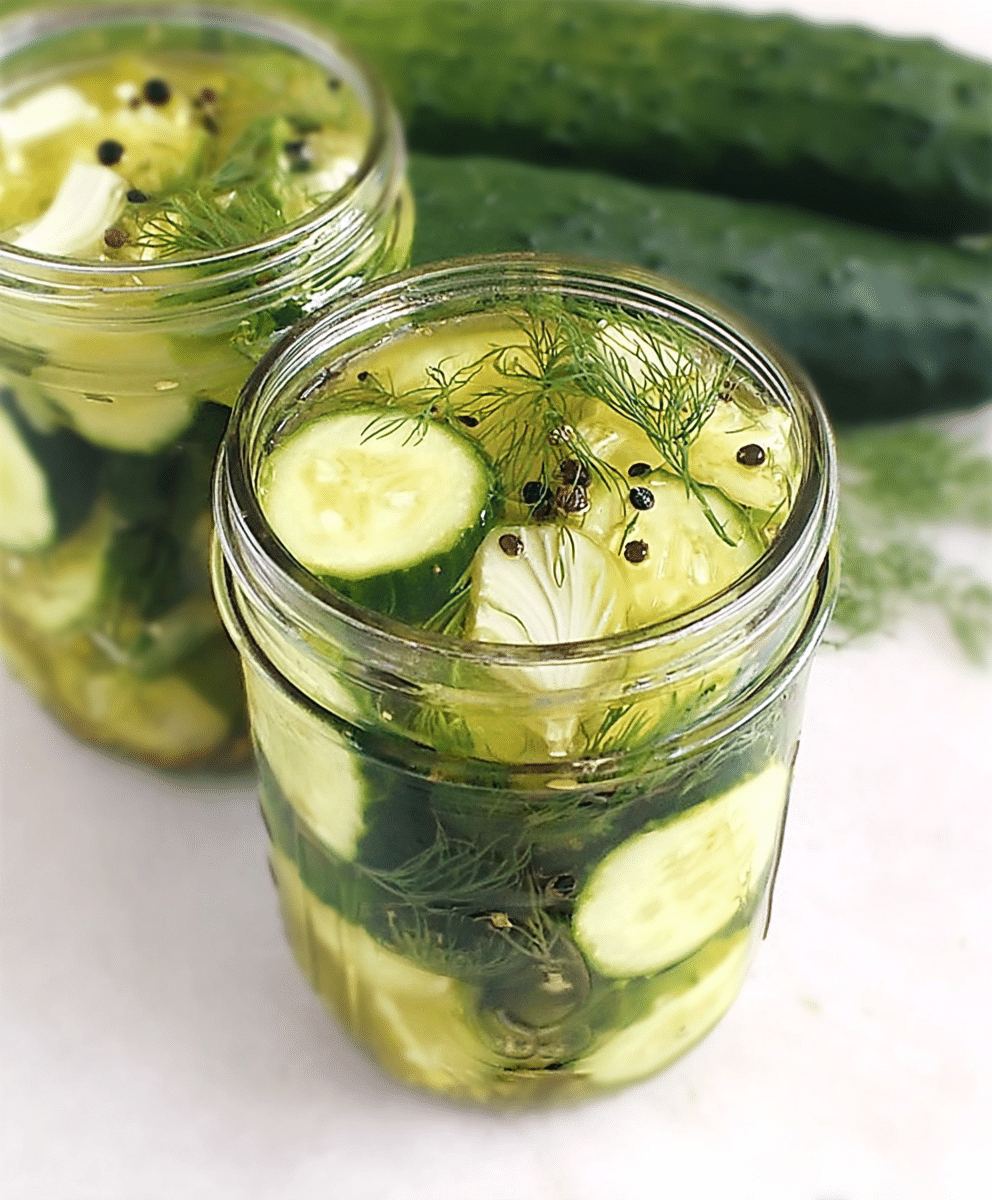
There’s something deeply satisfying about opening the refrigerator and seeing a row of homemade jars lined up, filled with crisp vegetables and brine that you made yourself. The sight alone can spark the anticipation of that first crunchy bite — cool, tangy, and bursting with flavor. Pickles have been a part of home kitchens for generations, but traditional canning can feel intimidating to the modern home cook.
That’s where refrigerator pickles come in. They capture all the zippy, herby goodness of classic dill pickles without the time-consuming, heat-intensive preservation process. You simply mix up a quick brine, pour it over fresh cucumbers and aromatics, and let the refrigerator work its magic. Within 24 hours, you have something special — a crisp, tangy treat that tastes far more vibrant than anything you can buy at the store.
This recipe for Garlic and Dill 24-Hour Refrigerator Pickles is all about fresh flavor and ease. There’s no waiting weeks for fermentation, no special equipment beyond some jars and a saucepan, and the whole process takes less than 15 minutes of active time. Whether you’re serving them alongside burgers at a summer cookout, tucking them into sandwiches, or just snacking straight from the jar, these pickles deliver a refreshing crunch with every bite.
Why You’ll Love This Recipe
- Quick turnaround – you can enjoy crisp, flavorful pickles in just one day.
- Consistent crunch – the short refrigeration process keeps cucumbers firm and fresh.
- No canning required – perfect for beginners or anyone short on time.
- Customizable flavor – adjust garlic, dill, or spice levels to suit your taste.
- Versatile use – from sandwiches to salads to cheese boards, these pickles fit right in.
Ingredients Breakdown
Yield: About 8–10 servings (2 pint jars)
Cucumbers
- 2 medium cucumbers, about 8–9 inches long each, washed and ends trimmed
Flavorings (per jar)
- 1 clove garlic, peeled and lightly crushed (2 total)
- ½ teaspoon mustard seeds (1 teaspoon total)
- ½ teaspoon black peppercorns (1 teaspoon total)
- 1 heaping teaspoon fresh chopped dill (2 heaping teaspoons total)
Brine (for both jars)
- 1 cup white distilled vinegar, 5% acidity minimum
- 1 cup water
- 2 tablespoons sugar
- 1 tablespoon kosher salt
Tools & Equipment Needed
- 2 pint-sized heat-safe mason jars with lids
- Small saucepan
- Measuring cups and spoons
- Chef’s knife and cutting board
- Funnel (optional but helpful for pouring brine)
Step-by-Step Instructions
- Prepare the Cucumbers
Wash cucumbers thoroughly and trim off both ends. This small step is important because the blossom end contains enzymes that can soften pickles over time. Slice the cucumbers into spears for snacking or rounds if you plan to use them in sandwiches. - Add Aromatics to Jars
Divide the garlic, mustard seeds, black peppercorns, and dill evenly between the two jars. This layering ensures every pickle is infused with the same balanced flavor. - Pack the Cucumbers
Arrange the cucumber slices snugly in each jar, standing spears upright or layering rounds neatly. Pack them tightly enough to minimize floating, but not so firmly that they bruise. - Make the Brine
In a small saucepan, combine vinegar, water, sugar, and kosher salt. Bring to a gentle simmer over medium heat, stirring until the sugar and salt dissolve completely. Remove from heat as soon as the brine is ready — no need to boil vigorously. - Pour the Brine
Using a ladle or measuring cup, carefully pour the hot brine over the cucumbers in each jar, making sure the slices are completely submerged. Leave about half an inch of space at the top of each jar. - Seal and Cool
Secure the lids tightly. Allow the jars to cool at room temperature for about 30 minutes before transferring them to the refrigerator. - Refrigerate for 24 Hours
This waiting period allows the cucumbers to absorb the brine and develop their full flavor. While they’ll be tasty after a few hours, the magic really happens overnight. - Serve and Enjoy
Once ready, serve the pickles chilled. Enjoy them straight from the jar, on sandwiches, or as part of a grazing board.
Tips & Variations
- For a Spicy Version: Add a pinch of red pepper flakes or a few slices of fresh jalapeño to each jar before pouring in the brine.
- Bread-and-Butter Style: Swap white vinegar for apple cider vinegar, increase sugar to 3 tablespoons, and add a pinch of ground turmeric.
- Herb Variations: Try tarragon, thyme, or basil instead of dill for a unique twist.
- Different Veggies: The same method works for carrot sticks, green beans, or thinly sliced radishes.
- Extra Garlic: Double the garlic for a stronger, more pungent bite.
Flavor Profile & Pairings
The flavor of these pickles is bright and clean, dominated by the crisp acidity of vinegar balanced with the mild sweetness of sugar. The dill provides a fresh, garden-like aroma, while the garlic adds savory depth. Mustard seeds and black peppercorns bring subtle spice without overpowering the palate.
Drink Pairings:
- With alcohol: Try a dry Riesling, a light pilsner, or a gin and tonic to complement the herbal notes.
- Non-alcoholic: Sparkling mineral water with lemon, iced green tea, or cucumber-mint lemonade.
Food Pairings:
- Piled high on burgers or hot dogs
- Layered into cold sandwiches or wraps
- Served alongside fried chicken for a refreshing contrast
- Added to potato or pasta salads for extra tang
Nutritional Overview (per serving, about 3–4 spears)
- Calories: ~20
- Protein: 0 g
- Carbohydrates: 4 g
- Fat: 0 g
- Fiber: 1 g
Naturally vegan, gluten-free, and dairy-free.
Make-Ahead & Meal Prep Tips
- Advance Prep: You can slice cucumbers and measure spices a day in advance. Keep cucumbers refrigerated and aromatics stored in airtight containers until ready to assemble.
- Batch Making: Double or triple the recipe to have pickles ready for parties or events.
- Storage: Keep jars refrigerated at all times. Use a clean utensil to remove pickles to prevent contamination.
FAQs
Q: Can I use a different type of vinegar?
A: Yes. Apple cider vinegar gives a milder, fruitier flavor, while rice vinegar adds subtle sweetness. Just ensure it’s at least 5% acidity for safe preservation.
Q: How long will they last?
A: When refrigerated and handled cleanly, these pickles stay fresh for up to 4 weeks.
Q: Can I reuse the brine?
A: You can reuse it once for another small batch, but the flavor may be lighter and the cucumbers slightly less crisp.
Q: Do I have to heat the brine?
A: Heating helps dissolve sugar and salt quickly and extracts maximum flavor from the aromatics, but you can also make a cold brine for an even crisper texture — just stir well until fully dissolved.
Cooking Timeline at a Glance
| Step | Time |
|---|---|
| Prep cucumbers | 5 min |
| Add flavorings | 3 min |
| Make brine | 5 min |
| Pour & seal | 2 min |
| Cool & refrigerate | 24 hrs |
Serving Suggestions
- Serve in small bowls as part of a backyard barbecue spread.
- Slice thin and layer onto turkey sandwiches or veggie wraps.
- Pair with smoked fish and cream cheese on rye bread.
- Use as a garnish for Bloody Mary cocktails.
Recipe Variations
- Mediterranean Twist: Add lemon slices, oregano, and a pinch of coriander seeds.
- Asian-Inspired: Swap dill for cilantro, add sliced ginger and a splash of rice vinegar.
- Sweet & Spicy: Increase sugar, add chili flakes, and a touch of honey for balance.
Ingredient Spotlight: Fresh Dill
Fresh dill is the hallmark of classic pickles.
- Choosing Dill: Look for bunches with bright green fronds and no yellowing.
- Storing: Wrap in a damp paper towel and keep in a resealable bag in the refrigerator.
- Maximizing Flavor: Chop just before using to release its oils and aromatic compounds.
Pro Cooking Tips
- Always trim cucumber ends to maintain firmness.
- Avoid overpacking jars to ensure brine circulates evenly.
- Let the pickles sit longer than 24 hours if you prefer a stronger, more developed flavor.
Storage & Freezing Guide
- Refrigerator: Keep in tightly sealed jars for up to 4 weeks.
- Freezing: Not recommended; cucumbers lose their crispness when frozen.
Nutrition Estimate Table (Per Serving)
| Calories | Protein | Carbs | Fat | Fiber | Notes |
|---|---|---|---|---|---|
| 20 | 0 g | 4 g | 0 g | 1 g | Vegan, gluten-free, dairy-free, nut-free |
Conclusion
Homemade Garlic and Dill 24-Hour Refrigerator Pickles prove that great flavor doesn’t require complicated techniques or hours in the kitchen. With just a handful of ingredients and a short wait, you can create crisp, tangy pickles that taste fresher and more vibrant than anything in a store-bought jar. They’re endlessly adaptable, work beautifully as part of countless meals, and bring a satisfying crunch to the table every time.
Once you’ve tried this recipe, you may find yourself keeping a batch in the fridge at all times — ready for impromptu guests, quick snacks, or that perfect bite alongside your favorite sandwich. It’s a small kitchen project with big rewards, and a reminder that sometimes, the simplest recipes are the ones you come back to again and again.
Print
Garlic and Dill 24-Hour Refrigerator Pickles
These quick and easy homemade garlic and dill 24-hour refrigerator pickles are fresh, crisp, tangy with a hint of sweet, and packed with flavor. No canning required!
- Total Time: 1 day 50 minutes
- Yield: 2 pints (about 32 spears or slices)
Ingredients
- 2 medium cucumbers, about 8 to 9 inches long each, washed and ends trimmed off
- 2 cloves garlic, peeled and lightly crushed
- 1 teaspoon mustard seeds, divided
- 1 teaspoon black peppercorns, divided
- 2 heaping teaspoons fresh chopped dill, divided
- 1 cup white distilled vinegar (5% acidity minimum)
- 1 cup water
- 2 tablespoons sugar
- 1 tablespoon kosher salt
- Special Equipment: 2 pint-sized heat-safe mason jars with lids
Instructions
- Slice cucumbers into spears or rounds as desired.
- Tightly pack cucumbers into jars.
- Add one clove of garlic, ½ tsp mustard seeds, ½ tsp peppercorns, and 1 tsp dill to each jar.
- In a small saucepan, combine vinegar, water, sugar, and salt. Bring to a boil, stirring until dissolved.
- Pour hot brine over cucumbers to fully cover them.
- Cool to room temperature (about 30 minutes).
- Cover jars with lids and refrigerate at least 24 hours before serving.
Notes
- Pickles must be stored in the fridge; they last 3–4 weeks.
- Pickling cucumbers or English cucumbers work best, but regular cucumbers are fine.
- If fresh dill is unavailable, substitute 1 tsp dried dill weed (½ tsp per jar) or freeze-dried dill.
- Warm jars before adding hot brine to prevent breakage.
- If brine doesn’t cover remaining pickles, top up with equal parts vinegar and water.
- Garlic may turn bluish; it’s harmless and caused by a natural reaction.
- This recipe is not for canning.
- Prep Time: 15 minutes
- Cook Time: 5 minutes
- Category: Condiment
- Method: No-Cook
- Cuisine: American
- Diet: Vegetarian