Halloween is all about creativity, fun, and a touch of the spooky. And what better way to combine all three than with Marshmallow Rice Krispies Halloween Brains? These eerie treats are as terrifying as they are tasty, perfectly blending crispy cereal, gooey marshmallows, and a strikingly creepy design that’s sure to delight trick-or-treaters, party guests, or family members looking for a festive snack.
Whether you’re hosting a Halloween gathering, baking with the kids, or preparing themed treats for school events, these Halloween brains are the ultimate edible centerpiece. The best part? They’re simple to make, no baking required, and incredibly fun to shape and decorate.
This recipe transforms a classic childhood favorite—Rice Krispies treats—into a spooky masterpiece. With minimal ingredients and a little creative flair, you can craft a batch of brains that looks impressive but tastes even better.
Why You’ll Love This Recipe
- No-Bake and Simple: No oven required—just melt, mix, and shape.
- Fun and Interactive: Perfect for baking with kids, parties, or family activity time.
- Customizable Decorations: Use red food coloring to create realistic brain veins or switch colors for creative variations.
- Crowd-Pleasing: Deliciously sweet, chewy, and crunchy, these treats disappear fast at any gathering.
- Versatile for Themes: Add mini chocolate chips for “neurons” or orange coloring for a pumpkin twist.
- Make-Ahead Friendly: Can be prepared in advance and stored at room temperature for up to 7 days.
Ingredients Breakdown
This recipe makes 12 brains, each approximately 180 kcal. All measurements are exact for perfect consistency and flavor.
Main Ingredients
- 6 tbsp Unsalted butter – Provides a smooth, rich base for the marshmallow mixture.
- 6 cups Regular marshmallows – The binding agent that creates a gooey, cohesive texture.
- 4 cups Rice Krispies cereal – Adds crunch and structure to the treat.
- ½ tsp Salt – Enhances sweetness and balances flavors.
- Red food coloring, as needed – Creates the classic creepy brain effect; can adjust for color intensity.
Tools & Equipment Needed
- Medium saucepan – For creating the water bath (bain-marie).
- Large heatproof bowl – To melt butter and marshmallows safely over simmering water.
- Wooden spoon – For stirring the hot marshmallow mixture.
- Kitchen towel – To hold the hot bowl securely while mixing.
- Butter knife – For carving the central groove of the brain.
- Toothpick – To draw realistic vein patterns for a spooky effect.
- Oiling hands – Not a tool per se, but necessary to shape the brains without sticking.
Step-by-Step Instructions
Step 1: Prepare the Bain-Marie
Fill a medium saucepan with ½ cup water and bring it to a gentle boil. Place a heatproof bowl over the saucepan, ensuring it does not touch the water. This creates a bain-marie that allows for gentle, even melting without scorching the marshmallows.
Step 2: Melt Butter and Marshmallows
Add 6 tbsp unsalted butter and 6 cups regular marshmallows to the heatproof bowl. Melt slowly, whisking continuously until the mixture is smooth, glossy, and free of lumps. The marshmallows should be fully melted and combined with the butter to create a cohesive, sticky mixture.
Step 3: Add Salt and Food Coloring
Remove the bowl from heat. Whisk in ½ tsp salt for flavor balance. Then add 2–3 drops of red food coloring (or more for a vivid effect). Mix thoroughly until the color is evenly distributed, giving the marshmallow mixture a pinkish-red base reminiscent of real brains.
Step 4: Combine with Rice Krispies
Pour the melted marshmallow mixture over 4 cups Rice Krispies cereal in a large mixing bowl. Stir quickly and thoroughly with a wooden spoon to ensure every crisp is coated evenly. Work swiftly, as the mixture will begin to set as it cools.
Step 5: Shape the Brains
Oil your hands lightly with butter or a neutral oil to prevent sticking. Portion the mixture into oval-shaped forms, roughly the size of a small fist, to mimic brain size. Press and smooth each piece gently, ensuring a solid shape.
Step 6: Carve the Brain Groove
Use a butter knife to carve a central groove down the middle of each brain. This simple step instantly gives your treat a realistic look, resembling the left and right hemispheres of an actual brain.
Step 7: Draw Veins for a Spooky Effect
Dip a toothpick in red food coloring and draw squiggly, vein-like patterns on each brain. This step adds depth and realism, turning a simple Rice Krispies treat into a frightfully fun Halloween centerpiece.
Tips & Variations
- Mini Chocolate Chips: Add a few chocolate chips into the mixture for “neurons” inside the brains.
- Peanut Butter Variation: Replace part of the butter with peanut butter for a richer, nutty flavor.
- Orange or Green Brains: Swap red food coloring with orange or green for themed Halloween or sci-fi brains.
- Gluten-Free Option: Ensure Rice Krispies cereal is gluten-free for guests with dietary restrictions.
- Make Smaller Portions: Create bite-sized brains for individual servings or party favors.
Flavor Profile & Pairings
- Taste: Sweet, slightly buttery, and chewy with a classic marshmallow-cereal flavor.
- Texture: Soft and gooey interior with a subtle crunch from Rice Krispies.
- Visual Appeal: Brightly colored veins create a realistic, playful, and slightly grotesque look.
Though we won’t focus on drink pairings here, these brains are perfect for Halloween snack tables, in themed lunchboxes, or as a party treat for kids and adults alike.
Nutritional Overview
Each brain contains roughly 180 kcal. Here’s a basic nutritional snapshot:
- Calories: 180
- Protein: 1 g
- Carbohydrates: 36 g
- Fat: 3 g
- Saturated Fat: 1.5 g
- Sugar: 22 g
- Fiber: 0 g
Dietary Considerations: Vegetarian-friendly; contains gluten and dairy.
Make-Ahead & Meal Prep Tips
- Prepare Ahead: The marshmallow mixture can be made in advance and kept slightly warm to shape later.
- Storage: Store finished brains in an airtight container at room temperature for up to 7 days. Avoid refrigeration, which may dry them out.
- Freezing: Wrap each brain individually in plastic wrap and freeze. Thaw at room temperature before serving.
FAQs
1. Can I make these without red food coloring?
Yes. You can leave them plain white or experiment with other colors like orange or green for different effects.
2. What if my mixture is too sticky to shape?
Oil your hands generously or let the mixture cool slightly before shaping. It should still be pliable but easier to handle.
3. Can I add flavors other than butter or peanut butter?
Vanilla extract, almond extract, or even a small amount of peppermint can be added for creative flavor twists.
4. How do I make the veins more realistic?
Use a fine-tipped brush or toothpick and a concentrated food coloring for precise, intricate vein patterns.
5. Can I scale this recipe for more servings?
Absolutely. Simply double or triple all ingredients while keeping ratios consistent.
Cooking Timeline (at a Glance)
| Step | Task | Time |
|---|---|---|
| 1 | Melt butter and marshmallows | 5–7 mins |
| 2 | Mix with Rice Krispies | 2–3 mins |
| 3 | Shape brains | 5–7 mins |
| 4 | Carve groove and draw veins | 5 mins |
| Total | Prep and Assembly | ~20–25 mins |
Serving Suggestions
- Place the brains on a Halloween-themed platter surrounded by candy corn or edible spiders.
- Use clear jars for spooky party favors.
- Stack mini brains in decorative bowls for a fun snack display.
Recipe Variations
- Chocolate Brains: Add cocoa powder to the marshmallow mixture for a dark, chocolatey brain.
- Peanut Butter Brains: Substitute 2–3 tbsp of butter with peanut butter for a nutty variation.
- Mini Brains: Make bite-sized versions for individual snacks.
- Glow-in-the-Dark Brains: Use neon or glow-in-the-dark edible food colorings for a creepy effect at Halloween parties.
Ingredient Spotlight
Marshmallows
They are the key binding agent. Use regular marshmallows for best results. Avoid mini marshmallows, which may melt too quickly and change texture.
Rice Krispies
This cereal provides the crunch and structure. Use original Rice Krispies; for gluten-free, check the packaging for certified gluten-free labeling.
Red Food Coloring
Essential for creating realistic veins. Gel or liquid coloring works; adjust intensity for desired spooky effect.
Pro Cooking Tips
- Melt marshmallows slowly to avoid scorching.
- Work quickly when combining with cereal; mixture sets fast.
- Oil your hands lightly before shaping to prevent sticking.
- Use a small tool like a toothpick for detailed vein patterns.
Storage & Freezing Guide
| Component | Storage Method | Duration |
|---|---|---|
| Shaped brains | Airtight container, room temperature | Up to 7 days |
| Dough/marshmallow mixture | Slightly warm, covered | Up to 1 day |
| Freezing finished brains | Wrap individually, freezer-safe bag | 1–2 months |
Thawing: Bring to room temperature for 15–20 minutes before serving.
Nutrition Estimate Table (Per Brain)
| Nutrient | Amount |
|---|---|
| Calories | 180 kcal |
| Carbohydrates | 36 g |
| Protein | 1 g |
| Fat | 3 g |
| Saturated Fat | 1.5 g |
| Sugar | 22 g |
| Fiber | 0 g |
Dietary Notes: Vegetarian-friendly, contains dairy and gluten, nut-free.
Expanded Conclusion
These Marshmallow Rice Krispies Halloween Brains are a show-stopping, fun, and delicious treat perfect for Halloween. They combine nostalgic childhood flavors with a festive, spooky twist, turning simple ingredients into a crowd-pleasing centerpiece.
From their gooey, buttery texture to the crunchy Rice Krispies foundation and detailed red-veined decorations, every bite is fun, flavorful, and visually striking. They’re easy to make, customizable, and ideal for family baking projects, school parties, or themed Halloween displays.
With just a handful of ingredients, a little creativity, and some patience, you can create a batch of brains that’s both creepy and irresistibly tasty. Try them this Halloween, share with friends and family, and watch these spooky treats disappear in no time.
These treats remind us that holiday baking is about fun, creativity, and connection—and no Halloween table is complete without a few brains to scare and delight your guests.
Print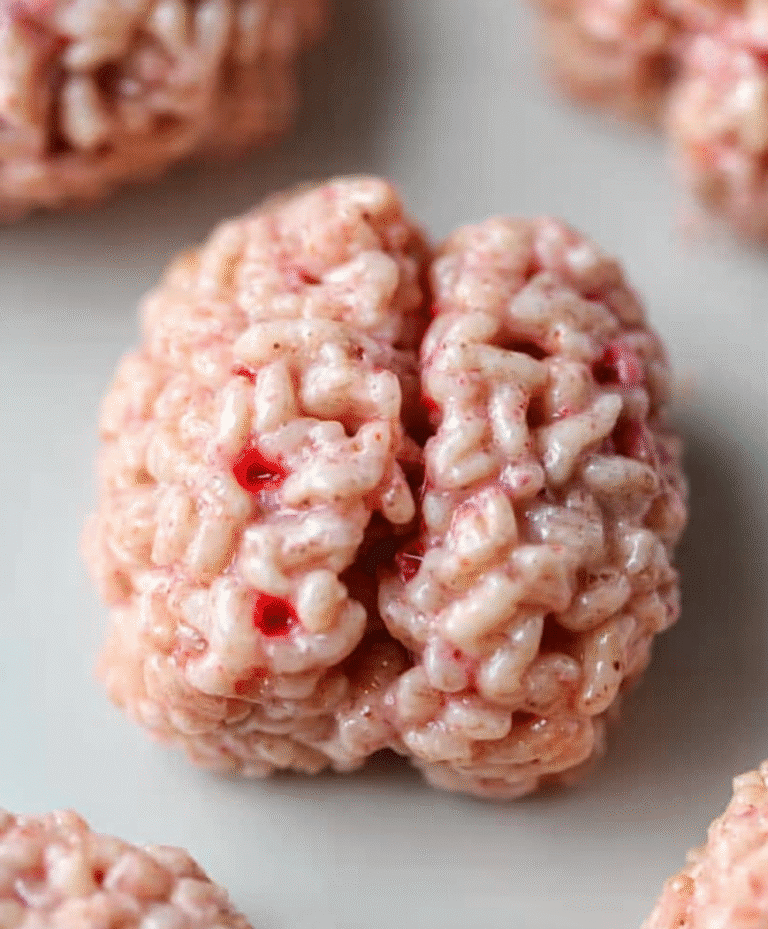
Marshmallow Rice Krispies Halloween Brains
These spooky Marshmallow Rice Krispies Halloween Brains are creepy, chewy, and perfect for Halloween parties. With gooey marshmallow, crispy cereal, and red-tinted veins, they’re both gross and delicious — a guaranteed hit for kids and adults alike!
- Total Time: 30 minutes
- Yield: 12 brains
Ingredients
- 6 tbsp unsalted butter
- 6 cups regular marshmallows
- 4 cups Rice Krispies cereal
- ½ tsp salt
- Red food coloring, as needed
Instructions
- Fill a medium saucepan with ½ cup of water and bring to a gentle boil. Place a heatproof bowl over it to create a bain-marie.
- Add butter and marshmallows to the bowl and melt slowly, whisking until smooth and glossy.
- Remove from heat, whisk in salt and 2–3 drops of red food coloring until light pink.
- Pour the marshmallow mixture over Rice Krispies and stir quickly to coat evenly.
- Oil your hands and shape portions into oval brain forms. Use a butter knife to carve a groove down the center for the brain effect.
- Dip a toothpick in red food coloring and draw squiggly veins across each brain for realism.
- Let cool for about 20 minutes before serving.
Notes
- Store in an airtight container at room temperature for up to 7 days.
- Add mini chocolate chips for ‘neurons’ or use orange coloring for pumpkin-style brains.
- Oil your hands well to prevent sticking while shaping.
- Prep Time: 20 minutes
- Cook Time: 10 minutes
- Category: Dessert
- Method: No-Bake
- Cuisine: American
- Diet: Vegetarian