If comfort food had a love child with convenience, it would probably be these Ooey-Gooey Cheesy Garlic Chicken Wraps. Imagine tender chicken, perfectly seasoned garlic, creamy sauce, and melty cheese all wrapped up in a soft tortilla. Every bite is bursting with flavor, and the best part? These wraps are quick to prepare, customizable, and irresistibly satisfying.
Whether you’re making lunch for yourself, feeding hungry teenagers, or throwing together a casual dinner, these wraps are a crowd-pleaser. They’re ideal for weeknight dinners, meal prep, or even a fun weekend snack, and they strike the perfect balance between indulgent and approachable.
With just a handful of ingredients, you can achieve restaurant-quality flavor at home. The garlic gives a savory depth, the cheese brings that signature ooey-gooey goodness, and the wraps hold everything together for a portable, mess-free meal.
Why You’ll Love This Recipe
- Quick & Easy: Ready in under 20 minutes.
- Flavor Explosion: Garlic, cheese, and chicken come together perfectly.
- Customizable: Swap tortillas or cheese types to suit your diet.
- Perfect for Leftovers: Use leftover rotisserie chicken or pre-cooked chicken for instant meals.
- Kid-Friendly: Mild, cheesy, and full of comforting flavors that everyone loves.
Ingredients Breakdown
Servings: 2 wraps
For the Wrap Filling
- 7 oz cooked chicken, chopped (~200 grams, rotisserie recommended)
- 2 garlic cloves, minced or grated (adjust to taste)
- 2 tablespoons light mayonnaise
- 1 tablespoon light Greek yogurt or plain yogurt
- 2 teaspoons hot sauce (like Frank’s)
- 1/4 teaspoon salt
- 3 oz grated cheese (~90 grams, cheddar blend recommended)
- 1 green onion, chopped
Wraps
- 2 large tortillas (regular, low-carb, or high-protein)
- Olive oil spray
Tools & Equipment Needed
- Medium mixing bowl
- Whisk or fork
- Knife and cutting board
- Non-stick skillet or griddle
- Spatula
- Cheese grater (if not pre-grated)
Step-by-Step Instructions
1. Prepare the Chicken Filling
- In a medium mixing bowl, combine the chopped chicken, minced garlic, mayonnaise, Greek yogurt, hot sauce, and salt.
- Stir until everything is evenly coated and creamy.
2. Assemble the Wraps
- Lay out the tortillas on a clean surface.
- Evenly distribute the chicken mixture onto each tortilla.
- Sprinkle the grated cheese on top of the chicken filling.
- Add chopped green onions for a fresh, slightly sharp contrast.
3. Cook the Wraps
- Heat a non-stick skillet or griddle over medium heat.
- Lightly spray the pan with olive oil.
- Fold the tortillas to encase the filling and place them seam-side down in the skillet.
- Cook 2–3 minutes per side, pressing lightly with a spatula, until the tortillas are golden and the cheese is melted.
4. Serve & Enjoy
- Slice the wraps in half for easier handling.
- Serve immediately with extra hot sauce or a side of salsa if desired.
Tips & Variations
- Cheese Options: Use mozzarella for a stretchy melt, or pepper jack for a spicy kick.
- Add Veggies: Sautéed bell peppers, mushrooms, or spinach make a hearty addition.
- Low-Carb or Keto: Use low-carb tortillas or large lettuce leaves for a wrap alternative.
- Meal Prep Friendly: Prepare filling in advance and assemble wraps when ready to cook.
- Spicy Lovers: Add more hot sauce or sprinkle chili flakes before cooking.
Flavor Profile & Pairings
These wraps are creamy, garlicky, and cheesy with a subtle tang from Greek yogurt and a mild heat from hot sauce. The tortillas provide a soft, slightly crispy exterior while keeping everything warm and melty inside.
Drink Pairings:
- Non-Alcoholic: Sparkling water with a squeeze of lime, iced tea, or lemonade.
- Alcoholic: Crisp lager or a light white wine like Pinot Grigio.
Side Pairings:
- Sweet potato fries or baked potato wedges
- Simple green salad with lemon vinaigrette
- Guacamole or salsa for dipping
Nutritional Overview (Estimated Per Wrap)
- Calories: ~380 kcal
- Protein: 27g
- Carbohydrates: 28g
- Fat: 18g
- Fiber: 2g
Values vary depending on tortilla choice and type of cheese.
Make-Ahead & Meal Prep Tips
- Chicken Filling: Can be prepared up to 2 days in advance and stored in an airtight container in the fridge.
- Assembling Wraps: Assemble just before cooking to prevent soggy tortillas.
- Storage: Cooked wraps can be stored in the fridge for 1 day; reheat in a skillet for best results.
FAQs
Q1: Can I use shredded rotisserie chicken?
Yes! Shredded or chopped chicken works equally well.
Q2: Can I make this vegan?
Substitute chicken with plant-based protein, use vegan mayo and cheese.
Q3: How do I prevent tortillas from getting soggy?
Cook immediately after assembling and avoid overfilling.
Q4: Can I freeze these wraps?
Yes, assemble without cooking and wrap individually in foil. Freeze up to 1 month; reheat in the oven.
Cooking Timeline (At a Glance)
| Step | Task | Time |
|---|---|---|
| 1 | Prepare filling | 5 min |
| 2 | Assemble wraps | 3 min |
| 3 | Cook wraps | 6 min |
| 4 | Serve | 1 min |
Total: ~15 minutes
Serving Suggestions
- Serve family-style with a side of fries, chips, or roasted veggies.
- Slice into bite-sized pieces for parties or game-day snacks.
- Garnish with extra chopped green onions or a drizzle of hot sauce.
Recipe Variations
- Buffalo Chicken Wrap: Use hot sauce and blue cheese crumbles.
- Mediterranean Chicken Wrap: Add feta, olives, and cucumber slices.
- BBQ Chicken Wrap: Replace hot sauce with BBQ sauce and add roasted red peppers.
Ingredient Spotlight: Garlic
Garlic is a star flavor in these wraps, providing depth and aroma. Use fresh garlic for the best flavor — minced or grated to evenly distribute through the chicken mixture.
Storage Tip: Store peeled garlic cloves in a cool, dark place for up to 2 weeks. Avoid refrigeration unless peeled and chopped.
Pro Cooking Tips
- Medium Heat: Cook wraps on medium heat to melt cheese without burning the tortilla.
- Press Gently: Light pressure with a spatula ensures even browning and melted cheese.
- Even Filling: Distribute chicken and cheese evenly to prevent spilling during cooking.
Storage & Freezing Guide
- Refrigeration: Store cooked wraps in an airtight container for 1 day. Reheat in a skillet for best texture.
- Freezing: Assemble without cooking and wrap individually. Freeze up to 1 month. Cook from frozen in a skillet or oven.
- Avoid Microwave for Best Texture: Microwave may make tortillas soggy; stovetop or oven reheating is preferred.
Nutrition Table (Per Wrap)
| Nutrient | Amount |
|---|---|
| Calories | 380 kcal |
| Protein | 27g |
| Carbs | 28g |
| Fat | 18g |
| Fiber | 2g |
Dietary Notes: High-protein; can be adapted for low-carb or vegan diets.
Conclusion
These Ooey-Gooey Cheesy Garlic Chicken Wraps are the ultimate comfort food made easy. They combine tender chicken, melty cheese, garlic flavor, and just a touch of heat in every bite. Whether for a quick lunch, weeknight dinner, or snack for entertaining, they are guaranteed to disappear fast.
The recipe is versatile, quick, and forgiving — perfect for home cooks of all skill levels. From swapping cheeses and tortillas to adding veggies or trying different flavor twists, you can make these wraps your own.
Next time you’re craving something cheesy, garlicky, and utterly satisfying, these wraps are your answer — simple to prepare and impossible to resist.
Print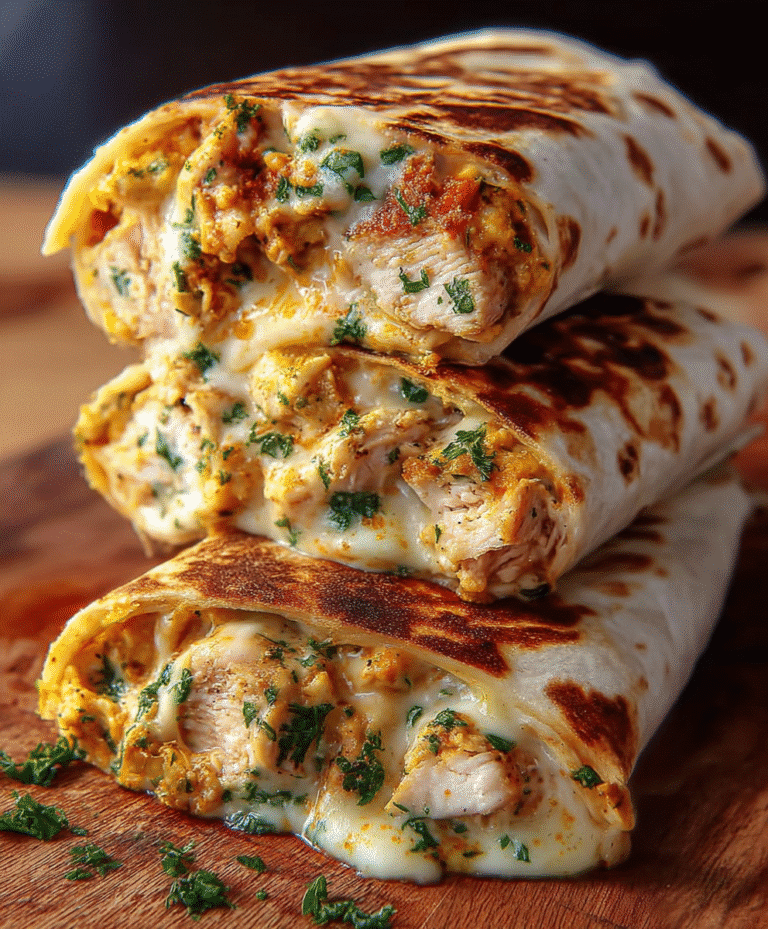
Ooey-Gooey Cheesy Garlic Chicken Wraps You’ll Devour
Cheesy Garlic Chicken Wraps — crispy on the outside, gooey and garlicky inside. A high-protein, satisfying meal perfect for lunch or dinner.
- Total Time: 22 minutes
- Yield: 2 servings
Ingredients
- 2 large tortillas (regular or low-carb/high-protein)
- 7 oz cooked chicken (about 200 grams), chopped
- 2 garlic cloves, minced or grated
- 2 tablespoons light mayonnaise
- 1 tablespoon light Greek yogurt or plain yogurt
- 2 teaspoons hot sauce (like Frank’s)
- ¼ teaspoon salt
- 3 oz grated cheese (about 90 grams, cheddar blend)
- 1 green onion, chopped
- Olive oil spray
Instructions
- In a bowl, mix chopped chicken, garlic, mayonnaise, yogurt, hot sauce, and salt.
- Lay out your wrap. On the lower third of the tortilla, sprinkle about 2 tablespoons of cheese, then top with about ⅔ cup of the chicken mixture. Add another tablespoon of cheese and a sprinkle of green onion.
- Fold in the sides of the tortilla, then roll it up tightly from the bottom.
- Heat a non-stick pan over medium-high. Spray with olive oil.
- Place wraps seam-side down. Cook for 3–4 minutes per side until crispy and golden. Cover with a lid to help heat the inside.
- Slice in half and serve!
Notes
- Covering the pan helps melt the cheese and warm the filling faster.
- Make the chicken filling ahead and keep in the fridge for up to 3 days.
- For a lighter version, reduce the cheese.
- Air fryer: 375°F (190°C) for 6–8 minutes.
- Bake at 400°F (200°C) for 10–12 minutes, flipping once, for a crispier result.
- Use leftover filling in toasties, quesadillas, or stuffed into baked potatoes.
- Store cooked wraps in the fridge for up to 2 days. Filling can be frozen up to 1 month.
- Serve with salad, roasted veggies, pickles, or salsa.
- Prep Time: 15 minutes
- Cook Time: 7 minutes
- Category: Lunch
- Method: Wrap
- Cuisine: Healthy