A golden, cheesy twist on classic tacos, these Oven-Baked Cheesy Tacos are everything you crave in one bite — crispy shells, seasoned beef, and a melty layer of cheese baked to perfection. Topped with fresh lettuce, juicy tomatoes, and zesty onions, they’re the ultimate weeknight or party meal that satisfies everyone at the table.
Whether it’s Taco Tuesday, game day, or a casual family dinner, these tacos bring the crowd together with zero fuss and maximum flavor. Baking them in the oven transforms the classic handheld taco into a crispy, cheesy masterpiece — easy to prep, quick to bake, and even easier to devour.
Introduction
Tacos have a special way of turning an ordinary night into something fun and flavorful. There’s just something about the mix of textures — the crunch of the shell, the richness of the filling, and the brightness of the toppings — that makes tacos irresistible.
But these aren’t your average tacos. Oven-Baked Cheesy Tacos take everything you love about traditional tacos and elevate it. Instead of building each taco individually at the table, this recipe bakes them all together in one dish, melting the cheese perfectly and crisping up the shells for that satisfying crunch. It’s a little bit classic, a little bit clever, and a lot delicious.
Inspired by busy weeknights and the joy of effortless entertaining, this recipe simplifies taco night without sacrificing flavor. The oven does most of the work, freeing you up to focus on your toppings or just relax. Plus, the presentation — a pan full of golden, cheesy tacos — is pure comfort food magic.
These tacos are ideal for:
- Weeknight dinners when you want something quick and crowd-pleasing
- Game day gatherings and movie nights
- Family-style dinners with kids and adults alike
- Meal prepping ahead of a busy week
They’re fun, customizable, and seriously crave-worthy — with just the right balance of crispy, cheesy, and fresh.
Why You’ll Love This Recipe
- Crispy, cheesy perfection – Baking the tacos gives them a lightly crisp shell while melting the cheese beautifully.
- Family-friendly – Everyone can customize their own toppings, making it a guaranteed hit for kids and adults.
- Quick and easy – Just 35 minutes total time and a single pan to bake everything together.
- Customizable – Swap in ground turkey or chicken, add extra veggies, or mix up your cheese blend.
- Great for entertaining – Serve a tray of tacos straight from the oven — warm, melty, and ready to top.
- Make-ahead friendly – You can prep the meat filling in advance and assemble right before baking.
Ingredients Breakdown
Yield: 10 tacos
Diet: Gluten-Free (if using corn tortillas and GF taco seasoning)
For the Taco Filling
- 1 lb ground beef (or ground turkey/chicken) – Classic taco flavor starts here. Ground beef gives that rich, savory base, while turkey or chicken offer a leaner twist.
- 1 tbsp olive oil – Helps sauté the onions and keeps the meat moist.
- 1 small onion, diced – Adds sweetness and depth of flavor.
- 2 cloves garlic, minced – The aromatic backbone of the dish.
- 1 packet taco seasoning (or homemade mix) – The key to that signature taco taste; a blend of chili powder, cumin, paprika, and more.
- ½ cup tomato sauce or salsa – Moistens the filling and binds everything together.
- Salt & pepper, to taste – Enhances all the flavors.
For the Tacos
- 10 small taco shells (flour or corn, slightly warmed) – Warming makes them more pliable and prevents cracking during assembly.
- 2 cups shredded cheddar cheese (or Mexican blend) – The cheesy layer that melts into golden, gooey bliss.
For Topping
- 1 cup lettuce, shredded – Cool, crisp freshness to balance the cheesy richness.
- ½ cup diced tomatoes – Adds juicy, tangy contrast.
- ½ cup red onion, diced – Provides a sharp bite that complements the creamy cheese.
- ¼ cup fresh cilantro, chopped – Bright and herbaceous finish.
Optional Toppings
- Sour cream – For a creamy, tangy drizzle.
- Jalapeños – To bring the heat.
- Guacamole – Adds luscious creaminess and healthy fats.
- Hot sauce – For spice lovers who want that extra kick.
Tools & Equipment Needed
You don’t need fancy gadgets to make these tacos. Here’s what you’ll want on hand:
- Large skillet – For browning the beef and cooking the filling.
- Wooden spoon – To break up the meat evenly.
- Mixing spoon or spatula – For stirring in seasonings and sauce.
- Baking dish (9×13-inch works well) – To stand the tacos up for baking.
- Aluminum foil or parchment paper – For easy cleanup.
- Oven mitts – Essential for safe handling.
- Tongs – Helpful for serving.
- Sharp knife & cutting board – For prepping toppings.
Step-by-Step Instructions
Follow these simple steps for perfectly crispy, cheesy tacos every time.
1. Preheat the oven
Preheat your oven to 375°F (190°C). Line a baking dish with foil or lightly grease it to prevent sticking.
2. Sauté aromatics
In a large skillet, heat 1 tablespoon olive oil over medium heat. Add diced onion and minced garlic, sautéing until fragrant and slightly translucent — about 2–3 minutes.
3. Cook the meat
Add 1 lb ground beef to the skillet. Break it apart with a wooden spoon as it cooks. Continue stirring until the beef is browned and no longer pink.
4. Season the filling
Stir in 1 packet taco seasoning, ½ cup tomato sauce or salsa, and a pinch of salt and pepper to taste. Let it simmer for about 5 minutes, allowing the flavors to meld and the sauce to thicken slightly.
5. Assemble the tacos
Warm your 10 small taco shells slightly in the microwave (10–15 seconds) or on a skillet to make them flexible.
Fill each shell with the seasoned beef mixture, spooning it evenly among them. Sprinkle a generous amount of shredded cheddar cheese over each taco.
6. Arrange and bake
Stand the tacos upright in your prepared baking dish, side by side. This helps them keep their shape while baking and ensures even melting.
Bake for 10–15 minutes, until the cheese is melted and bubbly and the taco shells are lightly crisped around the edges.
7. Add toppings and serve
Carefully remove the dish from the oven. Top each taco with lettuce, tomatoes, red onion, and cilantro.
Serve immediately with your favorite toppings like sour cream, guacamole, jalapeños, or hot sauce.
Tips & Variations
- Make it leaner: Substitute ground turkey or chicken for the beef.
- Add beans: Stir in a half cup of black beans or pinto beans for added fiber and protein.
- Spice it up: Mix chopped jalapeños or chili flakes into the meat filling for extra heat.
- Vegetarian version: Replace the meat with sautéed mushrooms, lentils, or a plant-based crumble.
- Cheese swap: Try Monterey Jack, pepper jack, or a smoky gouda blend.
- Add crunch: Sprinkle crushed tortilla chips on top before baking for a fun texture.
Flavor Profile & Pairings
These tacos hit all the right notes — savory, cheesy, slightly spicy, and perfectly crispy. The seasoned beef gives a classic taco base, balanced by the cool, fresh toppings and the melted cheese that ties it all together.
Drink pairings:
- Wine: A chilled Sauvignon Blanc or a light Zinfandel complements the spice and richness.
- Beer: A crisp Mexican lager or pale ale pairs beautifully.
- Non-alcoholic: Sparkling lime water or iced hibiscus tea adds a refreshing contrast.
Side dish ideas:
- Mexican rice or cilantro-lime rice
- Creamy refried beans or black bean salad
- Roasted corn on the cob or street corn salad
- Fresh fruit salsa with tortilla chips
Nutritional Overview (Per Taco)
| Nutrient | Amount |
|---|---|
| Calories | 250 |
| Protein | 15g |
| Carbohydrates | 20g |
| Fat | 15g |
| Saturated Fat | 7g |
| Fiber | 2g |
| Sugar | 2g |
| Sodium | 500mg |
| Cholesterol | 50mg |
Dietary Notes: Gluten-free if using corn shells and GF taco seasoning. Nut-free and high in protein.
Make-Ahead & Meal Prep Tips
These tacos are meal-prep friendly and easy to assemble ahead.
- Prep the filling: Cook the ground beef mixture up to 3 days in advance. Store it in an airtight container in the refrigerator.
- Assemble before baking: Fill the taco shells and refrigerate for up to 12 hours before baking. Add cheese just before putting them in the oven.
- Reheat leftovers: Bake at 350°F (175°C) for 8–10 minutes to re-crisp the shells.
- Freezer-friendly: Freeze the cooked meat filling (not the assembled tacos) for up to 2 months.
FAQs
1. Can I use soft tortillas instead of crunchy shells?
Yes, but they won’t crisp up the same way. If using soft tortillas, brush lightly with oil before baking to help them crisp.
2. Can I make these tacos vegetarian?
Absolutely. Use plant-based ground meat or a combination of black beans, corn, and sautéed vegetables.
3. How do I keep tacos from getting soggy?
Don’t overfill them with sauce, and bake just until the cheese melts. You can also line the bottoms with shredded cheese before adding the meat to act as a moisture barrier.
4. What’s the best cheese for baked tacos?
Cheddar, Monterey Jack, or a Mexican blend all melt beautifully. For extra gooeyness, mix in a bit of mozzarella.
5. How long do leftovers last?
Up to 3 days in the refrigerator when stored in an airtight container. Reheat in the oven for the best texture.
Cooking Timeline (At a Glance)
| Step | Task | Time |
|---|---|---|
| Prep | Chop onion, garlic, and toppings | 10 min |
| Cook | Prepare meat filling | 10 min |
| Assemble | Fill and arrange tacos | 5 min |
| Bake | Melt cheese and crisp shells | 10–15 min |
| Total | Ready to serve | ~35 min |
Serving Suggestions
Presentation makes these tacos extra fun. Serve them standing upright in the baking dish or in a taco holder for a tidy, professional look. Scatter extra cilantro and lime wedges on the side for color and freshness.
If serving for a crowd, create a DIY taco bar with bowls of toppings so everyone can customize their own.
Recipe Variations
- Loaded Chicken Tacos: Use shredded rotisserie chicken mixed with taco seasoning and salsa.
- Cheesy Bean & Corn Tacos: Replace half the beef with black beans and corn for a hearty vegetarian version.
- Spicy Ranch Tacos: Mix 2 tablespoons ranch dressing and hot sauce into the filling for a creamy kick.
- Breakfast Tacos: Use scrambled eggs, cooked sausage, and cheese — then bake for a brunch twist.
Ingredient Spotlight: Ground Beef
Ground beef is the heart of this dish. When choosing your beef:
- Opt for 85–90% lean for the best balance of flavor and moisture.
- Avoid overcooking — it should stay juicy, not dry.
- Season generously; taco seasoning and tomato sauce work together to create depth.
Storage tip: Keep raw beef refrigerated below 40°F (4°C) and cook within 1–2 days of purchase.
Enhancement idea: Add a splash of lime juice or a pinch of smoked paprika after cooking to brighten and deepen the flavor.
Pro Cooking Tips
- Warm your shells first: This prevents cracking when filling them.
- Drain excess fat: After browning the meat, drain any excess grease before adding sauce.
- Bake upright: Standing the tacos in the dish helps them crisp evenly.
- Use freshly shredded cheese: Pre-shredded cheese contains anti-caking agents that can prevent smooth melting.
- Serve immediately: They’re best hot from the oven while the cheese is still gooey and the shells are crisp.
Storage & Freezing Guide
To store:
- Keep leftover tacos in an airtight container in the fridge for up to 3 days.
- For best results, reheat in the oven to maintain crispiness.
To freeze:
- Freeze only the cooked meat filling (up to 2 months). Thaw overnight and reheat before assembling.
- Avoid freezing fully assembled tacos — the shells can become soggy upon thawing.
Nutrition Estimate Table (Per Taco)
| Nutrient | Amount |
|---|---|
| Calories | 250 |
| Protein | 15g |
| Carbohydrates | 20g |
| Total Fat | 15g |
| Saturated Fat | 7g |
| Fiber | 2g |
| Sugar | 2g |
| Sodium | 500mg |
| Cholesterol | 50mg |
Dietary Notes: Gluten-free (use corn shells), nut-free, and kid-friendly.
Expanded Conclusion
There’s a reason these Oven-Baked Cheesy Tacos have become a go-to favorite for families and food lovers alike. They’re everything a taco should be — easy, customizable, and bursting with flavor. The oven-baked method gives you a beautifully crisp shell and that irresistible melted cheese layer that brings it all together.
They’re perfect for casual weeknights, parties, or any time you want comfort food that delivers big satisfaction without a lot of effort. Once you try baking your tacos, you’ll never go back to the stovetop method again.
Give these cheesy, crispy tacos a try and share them with your loved ones. Serve them straight from the oven, top them generously, and watch them disappear.
If you love this recipe, don’t forget to bookmark it for your next taco night — and explore more cozy, flavorful meals like this on Kitchen-pop.
Print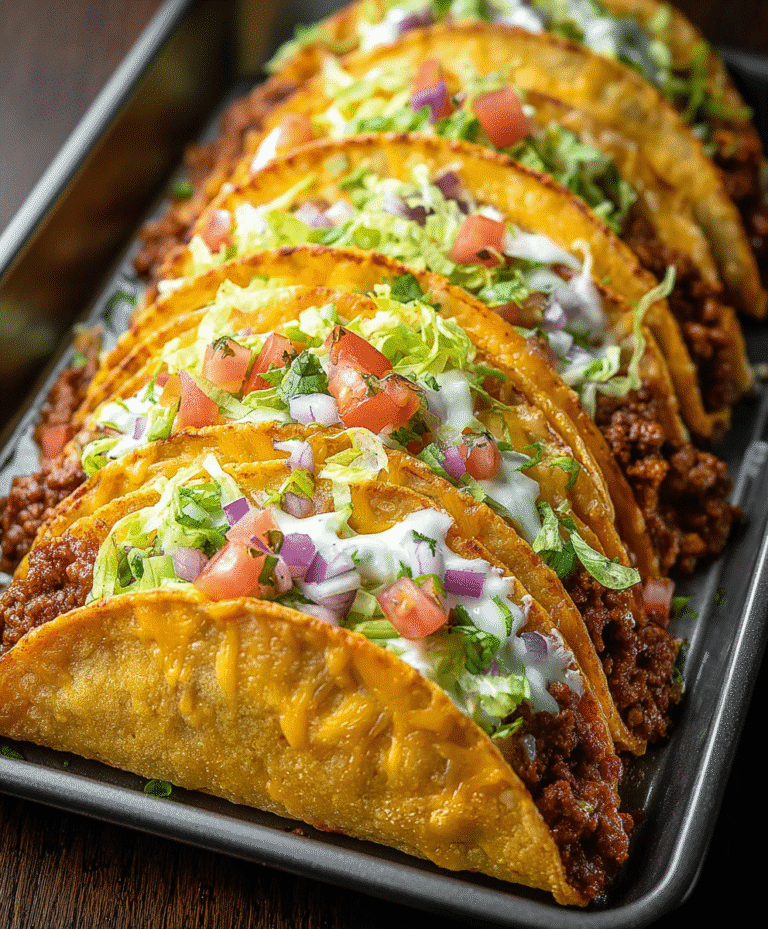
Oven-Baked Cheesy Tacos
A delicious twist on classic tacos tortillas filled with seasoned beef, layered with cheese, and baked until golden and crispy. Perfect for parties, weeknight dinners, or game day!
- Total Time: 35 minutes
- Yield: 10 tacos
Ingredients
- 1 lb ground beef (or ground turkey/chicken)
- 1 tbsp olive oil
- 1 small onion, diced
- 2 cloves garlic, minced
- 1 packet taco seasoning (or homemade mix)
- ½ cup tomato sauce or salsa
- Salt & pepper, to taste
- 10 small taco shells (flour or corn, slightly warmed)
- 2 cups shredded cheddar cheese (or Mexican blend)
- 1 cup lettuce, shredded
- ½ cup diced tomatoes
- ½ cup red onion, diced
- ¼ cup fresh cilantro, chopped
- Optional Toppings: Sour cream, Jalapeños, Guacamole, Hot sauce
Instructions
- Preheat oven to 375°F (190°C). Lightly grease a baking dish or line with foil.
- In a skillet, heat olive oil over medium heat. Add onion and garlic, sauté until fragrant.
- Add ground beef, breaking it up as it cooks. Stir in taco seasoning, tomato sauce, salt, and pepper. Simmer for 5 minutes.
- Fill each taco shell with meat mixture, sprinkle generously with cheese, and place standing side by side in the baking dish.
- Bake for 10–15 minutes, until cheese is melted and tacos are lightly crispy.
- Remove from oven and top with lettuce, tomatoes, onions, and cilantro. Add sour cream, guacamole, or hot sauce if desired.
Notes
- For a healthier option, use ground turkey or chicken.
- Feel free to customize toppings based on your preference.
- These tacos can be made ahead of time and baked just before serving.
- Prep Time: 15 minutes
- Cook Time: 20 minutes
- Category: Main Course
- Method: Baking
- Cuisine: Mexican
- Diet: Gluten Free